My son is 18 months old this month and we still haven't cut his beautifully long curling ends of reddish/brown hair. Even though people tell us at least once a week that we should have cut it a long time ago. Ugh, I hate it that!
Anyways, I was trying to think of a good Halloween costume for him this year and the thought of a Hobbit popped into mind. OH A HOBBIT! How perfect! He has the perfect look for it, loves walking around outside with large sticks so I know he'll walk about with a "walking stick" and I figured I could find all the perfect outfit pieces for his costume at the Goodwill, which I was able to do today!
I am so excited about the pieces that I found. I really wanted to find dark brown pants but I couldn't. I did find a pair of khakis and I think I'm just going to go to the super market and buy some dark brown dye and dye them.
I'm concerned about dying a pair of khakis because I know you're suppose to only dye white fabric.... So... Yeah... I need to find out some dying information.
(If you, yes you! Know anything about dying clothes I would love some feed back. Pretty please and thank you!)
I also found a white button up long shelve shirt that I'll have to alter just a tad and a dark green corduroy jacket that has cute little patches on the elbows of the shelves that's a few sizes to big which is perfect for the "Hobbit" look.
I have a few ideas on how to make a cloak but I'm not completely sure yet.
I also have a few other ideas that I'm pondering on but I'll save those for the pictures I plan to post as a "Halloween Costume Preview".

Tuesday, October 16, 2012

Sunday, October 14, 2012
French Toast Sandwich
This is one of my families favorite breakfast foods.
It's sweet yet savory and best with seasonal fresh fruit from a farmer's market.
I love buying fruits and veggies from farmer's markets.
1) I'm supporting my local community.
2) They always seem to taste better.
and 3) I know they are fresher then the produce that you find in a super market.
We also like this a lot because it's a lighter and probably healthier breakfast sandwich than your Egg McMuffins.

To make this delicious sandwich is pretty self explanatory but I'll humor you anyways...
The ingredients you'll need are:
Bread,
Eggs,
Cinnamon,
Pure Vanilla Extract,
Nutmeg,
All Spice,
(I have a secret ingredient that I'll never tell so your sandwiches won't be as scrumptious as mine... Sorry.)
Butter,
Cream Cheese,
Fresh Berries.
Heat a non-stick skillet on your stove top on a medium to medium-high heat.
Even though I use a non-stick pan I still like to put a tablespoon of REAL butter in it and have it melt down. As your skillet it heating up start on your egg mixture.
In a medium bowl, crack open 1 egg.
(Use 1 egg per 2 pieces of bread. 1 sandwich = 1 egg, 2 sandwiches = 2 eggs.)
Take a whisk or fork and scramble your egg/s.
I like to use a fork because it does the same thing as a whisk and it's a heck of a lot easier to clean. Let's be smart people, no need to give yourself extra work around the house when it's unnecessary.
I never measure the spices, I just give the cinnamon a few good heavy shakes, a few dashes of all spice, a pinch of nutmeg, you don't want to go over board with the nutmeg. Trust me!
Lastly, about 2 tablespoons of vanilla.
Mix those all together until the spices look evening mixed.
You may have to scrap the sides of your bowl because the spices will stick to them and you want all those yummy flavors.
After you have your soon to be delicious mix done, dip both sides of a piece of bread into it and put it in the pan. Watch it and wait to flip it until you get a nice golden brown color.
When you're finished with your french toast, spread the cream cheese on one side of 2 pieces of french toast and add fresh berries to one piece and put your warm slices of french toast together and there you have it!
A yummy breakfast sandwich that doesn't consist of a bunch of greasy bacon or sausage. Don't get me wrong... I love both bacon and sausage but we both know how fatty and unhealthy it is. Why does your butt, gut and thighs hate everything your tongue loves?
Yes it has cream cheese on it but it's a dairy product and I never feel guilty for eating real dairy unless it's ice cream, but that's not "real" dairy. If you're worried about calories then use a smaller amount than you normally would. Portion control is key. Oh, and you can use any type of berry you prefer. I tend to use more blue berries because my mother in-law has blueberry bushes and she likes to pick them and bring gallon bags over to us. I'm a lucky gal!
It's sweet yet savory and best with seasonal fresh fruit from a farmer's market.
I love buying fruits and veggies from farmer's markets.
1) I'm supporting my local community.
2) They always seem to taste better.
and 3) I know they are fresher then the produce that you find in a super market.
We also like this a lot because it's a lighter and probably healthier breakfast sandwich than your Egg McMuffins.
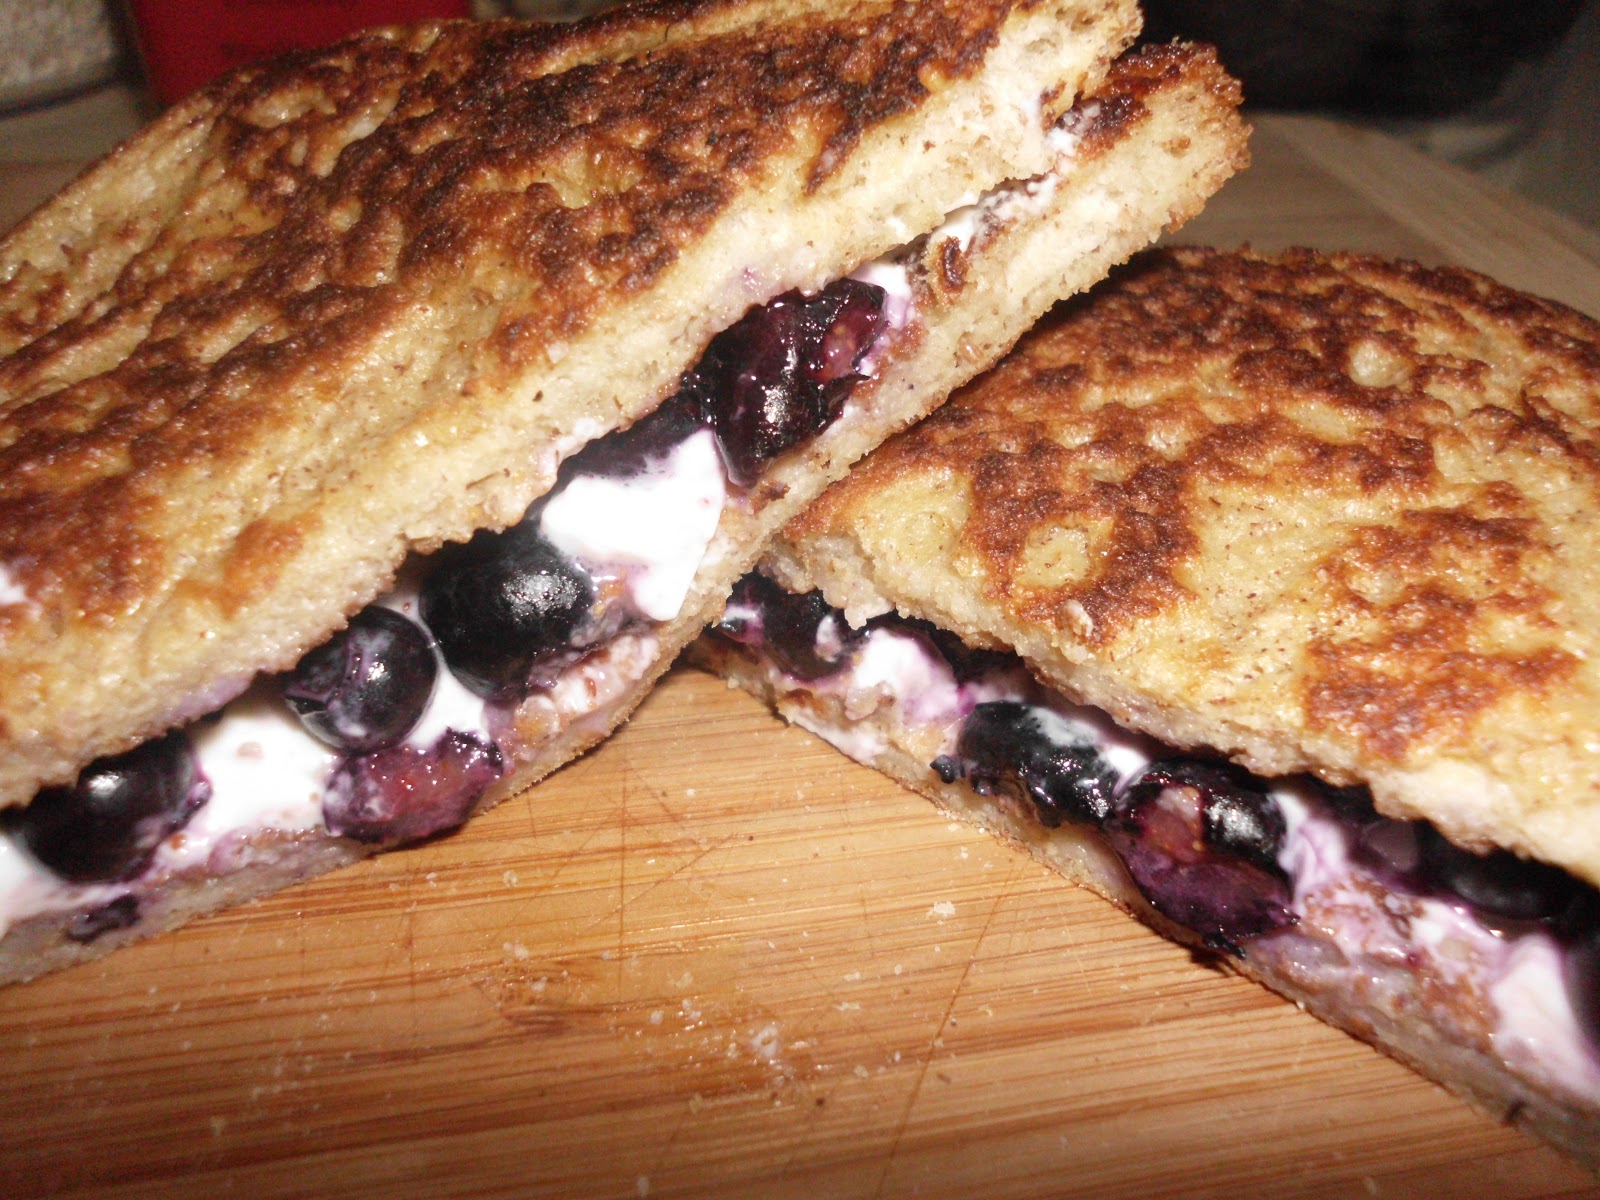
To make this delicious sandwich is pretty self explanatory but I'll humor you anyways...
The ingredients you'll need are:
Bread,
Eggs,
Cinnamon,
Pure Vanilla Extract,
Nutmeg,
All Spice,
(I have a secret ingredient that I'll never tell so your sandwiches won't be as scrumptious as mine... Sorry.)
Butter,
Cream Cheese,
Fresh Berries.
Heat a non-stick skillet on your stove top on a medium to medium-high heat.
Even though I use a non-stick pan I still like to put a tablespoon of REAL butter in it and have it melt down. As your skillet it heating up start on your egg mixture.
In a medium bowl, crack open 1 egg.
(Use 1 egg per 2 pieces of bread. 1 sandwich = 1 egg, 2 sandwiches = 2 eggs.)
Take a whisk or fork and scramble your egg/s.
I like to use a fork because it does the same thing as a whisk and it's a heck of a lot easier to clean. Let's be smart people, no need to give yourself extra work around the house when it's unnecessary.
I never measure the spices, I just give the cinnamon a few good heavy shakes, a few dashes of all spice, a pinch of nutmeg, you don't want to go over board with the nutmeg. Trust me!
Lastly, about 2 tablespoons of vanilla.
Mix those all together until the spices look evening mixed.
You may have to scrap the sides of your bowl because the spices will stick to them and you want all those yummy flavors.
After you have your soon to be delicious mix done, dip both sides of a piece of bread into it and put it in the pan. Watch it and wait to flip it until you get a nice golden brown color.
When you're finished with your french toast, spread the cream cheese on one side of 2 pieces of french toast and add fresh berries to one piece and put your warm slices of french toast together and there you have it!
A yummy breakfast sandwich that doesn't consist of a bunch of greasy bacon or sausage. Don't get me wrong... I love both bacon and sausage but we both know how fatty and unhealthy it is. Why does your butt, gut and thighs hate everything your tongue loves?
Yes it has cream cheese on it but it's a dairy product and I never feel guilty for eating real dairy unless it's ice cream, but that's not "real" dairy. If you're worried about calories then use a smaller amount than you normally would. Portion control is key. Oh, and you can use any type of berry you prefer. I tend to use more blue berries because my mother in-law has blueberry bushes and she likes to pick them and bring gallon bags over to us. I'm a lucky gal!
Saturday, October 13, 2012
DIY Diaper Cake
I was cleaning off my desk the other day and came a crossed an invitation to my friends baby shower that I had completely forgotten about.
Panic starts to set in!
Oh, holy crap!!! What in the world am I going to do with no time or budget to pick up a great gift?
I'm always so thoughtful and creative and I feel as if I ALWAYS have to be when giving gifts and plus it's for someone that was very thoughtful at my baby shower. I was excited about it when I first received the invitation but with lack of much needed sleep, my 1 year old running circles around me all day and trying to get all my house hold chores done it had easily slipped my mind. What was I to do with "no notice"? I need time to budget myself, save money, figure out what the mother to be needs and/or wants, plan what and how to present my gift, should I buy and put everything into a basket, tray, diaper bag, I GOT IT! A DIAPER CAKE!
It's cheap, easy and fool proof!!!
I could only afford to spend $25.00. Yikes, that doesn't seem like a lot of money when we're talking about a baby shower gift. Everyone knows how expensive baby stuff is unless you're a smart shopping, budgeting Momma like myself.
I went to Dollar General. Yes, I bought supplies for a baby shower gift at the dollar store.
Don't judge, be impressed!
Diaper cakes are super simple and easy.
The supplies that you'll need are:
(These are the items I bought today that were suited to the mother to be needs, but you can pretty much get whatever. Your options are endless!)
Diapers, (I used 50 diapers.) (the bigger count of diapers you buy the bigger your cake.)
Baby Wipes,
Bordeaux's Butt Paste,
Healthcare Kit, (medicine spoon, thermometer, nose cleaner, nail clippers, etc.)
Teething Ring,
Teething Tablets,
Rubber Bands, (make sure you have enough for each diaper and a few extra.)
Card Board,
Pen,
Scissors,
Card Board from a Toilet Paper Roll or Paper Towel Roll,
(paper towel roll is going to be your better option.)
Duct Tape,
Ribbon,
Curling Ribbon,
Card Stock
Gift Bag,
Tissue Paper.
Keep in mind, this isn't the "only" way to make a diaper cake, it's just the way I was able to make mine. I used what I had around the house so I could save some pennies.
No harm, no shame. It's what the mother to be needs and it looks really cute, so who cares.
Instructions:
Start out by rolling up the diapers. You'll want to lay the diaper front side down and with the top part of the diaper closest to you and roll and use a rubber band to keep them secure. Depending on how big your rubber bands are you may have to wrap them around the diaper and couple of times. I only needed to wrap it twice and be sure that the rubber band is in the middle of diapers.


I used 16 diapers for my top layer and 34 diapers for my bottom layer.
If you're making a cake just like mine take 16 already rolled up diapers and rubber band them all together with 1 rubber band. The rubber band needs to lay a crossed the rubber bands on the diapers. There's no need to wrap the rubber band twice around the layers, it should be secure enough to keep them all together.
And then do the same to the other 34 rolled up diapers.
Make sure that the outside of your layers aren't showing the ending rolled edge of the diapers.
It's easier to rubber band your rolls together and then turn any diaper rolls around.
This way the cake will have a clean, even look to it.
(See the 5th picture down from here to see what I mean.)
You'll need a platform for the bottom layer of your cake so when you pick it up it won't fall apart.
I didn't have anything special around the house so I used a card board diaper box that my sons diapers came in.
I broke the box down at the glued areas and opened it and laid it flat.
I then took my 34 ct. bottom layer of diapers and set it on top of the box and drew a circle around the layer as close to it as I could possibly get without getting ink on the diapers.
You could use a pencil for your circle outline but I wanted to be able to clearly see my marking.
 Cut out your circle outline.
You'll want to cut about 1 - 2 inches inside and all the way around your circle, that way you won't be able to see the card board when you put your bottom layer over it.
Then you'll duct tape a toilet paper or paper towel roll in the middle of your card board circle.
 My toilet paper roll is actually centered, my circle is just a bit lop sided because my scissors broke and I had to use a knife to cut my platform out.

I used a toilet paper roll because I didn't have a paper towel roll. Toilet paper rolls are long/short enough for 1 layer. Since I didn't have a paper towel roll. I cut off one of the longer flaps on the diaper box that I used to make my circle platform. I then bent the flap long ways to try and make a rod and rubber banded both ends together. I slipped my "card board rod" into the toilet paper roll hole, and placed the top layer of diapers over the "rod".
Try to center the card board the best you can in the middle of your diapers.


This is where it gets really fun!
Wrap your ribbon around the middle of each layer where you have your rubber band line and tie a pretty bow.
I then put the Teething Tablets on the top front of the bottom layer and tucked the top flap part of the box under the top layer bow. (Look at the picture and you'll see what I mean.)
I also had a few tiny plastic clothes pins that a friend gave me for my baby shower, I clipped them on the box flap and the top part of the bow on the top layer so it looks like there at holding up the box.
I also clipped tiny plastic baby bottles with ribbons glued to them onto the bottom layer bow with the tiny clothes pins.
You don't have to use embellishments, I did because I had them laying around the house.
I then took the Bordeaux's Butt Paste and stuffed it down the middle of the top layer of diapers right above where my "card board rod" is and then set the Teething Ring tilted on the front of it.
Last but not least.
I made a little note card to put on the cake.
I measured out a 3"x6" Card Stock strip and folded it in half and I recently bought a fancy little Martha Stewart paper punch (on clearance and saved $10. on it at Hobby Lobby! I love a great deal!!!) and with the card folded in half I punched along the top and bottom edges of the card.
I then punched a small hole in the side of it by the fold line with a hole punch and tied it to the top layer bow with curling ribbon. Honestly you could use any type of ribbon or string that you have around the house. Remember, saving pennies is a good thing... For anyone.

That's it. The diaper cake is finished and for the Baby Wipes and Healthcare Kit...
I didn't have enough room on the cake for them so I put them in a gift bag with tissue paper that I also had laying around the house and made a tag that looks the same as the one on the diaper cake and a pretty curling ribbon bow and put them on the gift bag..
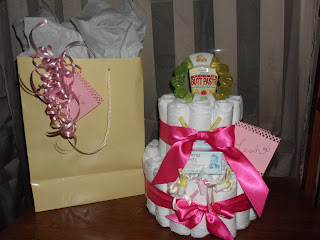 I really like it when I'm able to save little things like gift bags, ribbons, party embellishments, etc. etc. I recommend it to everyone as long as you have a place to keep it neatly organized. If you're not organized about little things like that then when the time comes to use it you probably won't be able to find it. So therefore, what's the point in having it if not to use?
I'm not the most organized person (lack of space) but I do keep all my party embellishments and supplies all together so I'll know exactly where I find them.
Thank God too, I would have spent more money then what my budget called for or wouldn't have been able to get my friend as much stuff as I did.
I hope this tutorial has inspired you in same way.
Panic starts to set in!
Oh, holy crap!!! What in the world am I going to do with no time or budget to pick up a great gift?
I'm always so thoughtful and creative and I feel as if I ALWAYS have to be when giving gifts and plus it's for someone that was very thoughtful at my baby shower. I was excited about it when I first received the invitation but with lack of much needed sleep, my 1 year old running circles around me all day and trying to get all my house hold chores done it had easily slipped my mind. What was I to do with "no notice"? I need time to budget myself, save money, figure out what the mother to be needs and/or wants, plan what and how to present my gift, should I buy and put everything into a basket, tray, diaper bag, I GOT IT! A DIAPER CAKE!
It's cheap, easy and fool proof!!!
I could only afford to spend $25.00. Yikes, that doesn't seem like a lot of money when we're talking about a baby shower gift. Everyone knows how expensive baby stuff is unless you're a smart shopping, budgeting Momma like myself.
I went to Dollar General. Yes, I bought supplies for a baby shower gift at the dollar store.
Don't judge, be impressed!
Diaper cakes are super simple and easy.
The supplies that you'll need are:
(These are the items I bought today that were suited to the mother to be needs, but you can pretty much get whatever. Your options are endless!)
Diapers, (I used 50 diapers.) (the bigger count of diapers you buy the bigger your cake.)
Baby Wipes,
Bordeaux's Butt Paste,
Healthcare Kit, (medicine spoon, thermometer, nose cleaner, nail clippers, etc.)
Teething Ring,
Teething Tablets,
Rubber Bands, (make sure you have enough for each diaper and a few extra.)
Card Board,
Pen,
Scissors,
Card Board from a Toilet Paper Roll or Paper Towel Roll,
(paper towel roll is going to be your better option.)
Duct Tape,
Ribbon,
Curling Ribbon,
Card Stock
Gift Bag,
Tissue Paper.
Keep in mind, this isn't the "only" way to make a diaper cake, it's just the way I was able to make mine. I used what I had around the house so I could save some pennies.
No harm, no shame. It's what the mother to be needs and it looks really cute, so who cares.
Instructions:
Start out by rolling up the diapers. You'll want to lay the diaper front side down and with the top part of the diaper closest to you and roll and use a rubber band to keep them secure. Depending on how big your rubber bands are you may have to wrap them around the diaper and couple of times. I only needed to wrap it twice and be sure that the rubber band is in the middle of diapers.


I used 16 diapers for my top layer and 34 diapers for my bottom layer.
If you're making a cake just like mine take 16 already rolled up diapers and rubber band them all together with 1 rubber band. The rubber band needs to lay a crossed the rubber bands on the diapers. There's no need to wrap the rubber band twice around the layers, it should be secure enough to keep them all together.
And then do the same to the other 34 rolled up diapers.
Make sure that the outside of your layers aren't showing the ending rolled edge of the diapers.
It's easier to rubber band your rolls together and then turn any diaper rolls around.
This way the cake will have a clean, even look to it.
(See the 5th picture down from here to see what I mean.)
You'll need a platform for the bottom layer of your cake so when you pick it up it won't fall apart.
I didn't have anything special around the house so I used a card board diaper box that my sons diapers came in.
I broke the box down at the glued areas and opened it and laid it flat.
I then took my 34 ct. bottom layer of diapers and set it on top of the box and drew a circle around the layer as close to it as I could possibly get without getting ink on the diapers.
You could use a pencil for your circle outline but I wanted to be able to clearly see my marking.

You'll want to cut about 1 - 2 inches inside and all the way around your circle, that way you won't be able to see the card board when you put your bottom layer over it.
Then you'll duct tape a toilet paper or paper towel roll in the middle of your card board circle.


Try to center the card board the best you can in the middle of your diapers.


This is where it gets really fun!
Wrap your ribbon around the middle of each layer where you have your rubber band line and tie a pretty bow.
I then put the Teething Tablets on the top front of the bottom layer and tucked the top flap part of the box under the top layer bow. (Look at the picture and you'll see what I mean.)
I also had a few tiny plastic clothes pins that a friend gave me for my baby shower, I clipped them on the box flap and the top part of the bow on the top layer so it looks like there at holding up the box.
I also clipped tiny plastic baby bottles with ribbons glued to them onto the bottom layer bow with the tiny clothes pins.
You don't have to use embellishments, I did because I had them laying around the house.
I then took the Bordeaux's Butt Paste and stuffed it down the middle of the top layer of diapers right above where my "card board rod" is and then set the Teething Ring tilted on the front of it.
Last but not least.
I made a little note card to put on the cake.
I measured out a 3"x6" Card Stock strip and folded it in half and I recently bought a fancy little Martha Stewart paper punch (on clearance and saved $10. on it at Hobby Lobby! I love a great deal!!!) and with the card folded in half I punched along the top and bottom edges of the card.
I then punched a small hole in the side of it by the fold line with a hole punch and tied it to the top layer bow with curling ribbon. Honestly you could use any type of ribbon or string that you have around the house. Remember, saving pennies is a good thing... For anyone.

That's it. The diaper cake is finished and for the Baby Wipes and Healthcare Kit...
I didn't have enough room on the cake for them so I put them in a gift bag with tissue paper that I also had laying around the house and made a tag that looks the same as the one on the diaper cake and a pretty curling ribbon bow and put them on the gift bag..

I'm not the most organized person (lack of space) but I do keep all my party embellishments and supplies all together so I'll know exactly where I find them.
Thank God too, I would have spent more money then what my budget called for or wouldn't have been able to get my friend as much stuff as I did.
I hope this tutorial has inspired you in same way.
Tuesday, October 9, 2012
DIY Distressed Coat Rack
After thinking up at least 100 different ways I wanted to make a coat rack, I finally just jumped in and made one.
I was going for an old rustic look with a hint of a collective chic flare.
I wanted to take tutorial pictures to make this so much easier to understand but I didn't have my camera at the time of the making of this project so I'll just do my best to talk you through it as detailed as possible.


- First off, I measured the wall area where I wanted to hang my coat rack, which is behind my front door and figured out how long and wide I wanted my coat rack to be. 38"x8"x1.5"
- I didn't want to make it with the usual hooks that you always see. I thought that different styled knobs would be really cute and at Hobby Lobby they just so happened to have dresser knobs 50% off this week (in my area) so I bought 7 of them.SCORE! This was meant to be!!!
- Went to Lowe's and bought a board that measures 8'x8"x1.5". My original plan was to stain the wood but I had my heart set on a darker Caribbean blueish-green. Well they had blue stains and green stains. Yes I know I could have bought one of each color and mixed them together but hey... I'm a budget kinda girl and I can't justify myself on buying more then what I need, so I settled for paint instead. I bought a quart sized Flat Valspar Ultra Paint + Primer called Turquoise Tint, which is way to much for what I need but I'll find more uses for it. I didn't buy the brown that I used because I had a quart in my tiny work shop cabinet and it's a Flat Olympic Premium called Spiced Wine. Both of the paints that I used are for interior.
- I don't have a table saw or a routing table so I asked my dear o'l Dad to help me out so he cut and routed all of the edges for me.
- When I got my board home I started in it right away. I used the crappiest 2" paint brush I had and started painting my board with the brush dry and as if I was a small child. I didn't apply much paint because I wanted a thin layer all over it. After it dried I sanded it down just a little bit here and there. I didn't use any rhyme or reason, just picked random places as I went along. I did sand a few areas like the beautiful knots in the board down to where you could actually see the wood it's self. You'll want to wipe all of sanding dust off. I then took a tiny can that I had saved and a plastic spoon and dipped out 3 or 4 spoon fulls of brown paint into it and mixed it with a little bit of water. Probably... about... 3 Tbsp. ??? I'm not really sure, I eye balled it until I got the thin consistency that I wanted. I wanted it really thin and watery. I used the same crappy 2" paint brush and lightly brushed on the brown. In a few areas I painted it heavier then others. Let that dry. Then I took the sand paper back to it and sanded it some more. Again, sanding down some areas more then others so I could bring out the blue-green paint and in some areas like the edges down to the wood. The areas where I sanded all the way down to the wood I took my finger, dipped it into the paint and rubbed it on the wood areas and lightly wiped it off with a paper towel. After you're finished with sanding wipe all the dust off again. After the brown paint dried I then sprayed it with a Clear coat of Matte Spray Paint to seal and protect it.The best tip I have is to not plan how it's going to look distressed. The more random the better. After all when you find an actual distressed object, Mother Nature doesn't "plan" on how that object ages. Also I personally don't think it matters what grit of sand paper you use, it all depends on how heavy your hand is and how long you want to sand your board.BAM step 5 is done.
- I then took the side of a hammer and lightly beat the board to make it look dinged up and even more distressed. I used the side of the hammer because I didn't want a bunch of little circles all over my board. Lines and marks are more appealing to me.
- I flipped my board over and found the center of the board by measuring and marked it with a pencil dot. Then I figured out how far apart I wanted all my knobs which came out to be 19" was my center and 5" between each knob on both sides from the center. I hope that makes sense. I then had my Love drill the holes straight through for me because I am terrible with power tools. I wanted my project to look distressed not sloppy.You'll want to measure your knob or hook screws in diameter to figure what size drill bit you'll need to use. The knobs I bought came with nuts to secure the knobs to your project. (They all should come with nuts and/or washers.) Since I want my coat rack to be flush with the wall my Love drilled bigger holes over the screw just enough so we were able to use a socket to tighten the nuts as much as we could to the knob screws so they would stay secure. We also drilled 2 up side down key shaped holes close to the top two corners so the nails in the wall would have a place to hold the board up (we used 2 different sized drill bits to accomplish that).
- Remember to keep the weight of your board in mind because you may have to use these weird little plastic things that your nail/screw goes into in the hole of the wall and then put your nail/screw in it. I know I sound ignorant but I honestly don't know what they are called. I do know they are commonly found boxed up with heavy shelves that you buy in a department store and that their purpose is to give strength to the wall for heavy objects. I had to use them for my coat rack.That's pretty much it, I now have a beautiful and uniquely made coat rack that adds the perfect touch of my living room.I do apologize if any of this was confusing, if you need more help feel free to drop me a line and I'll do my best to explain in better detail. It's late and I think the lack of sleep is starting to kick in.
Tuesday, September 18, 2012
I made Irish Stew!
All of my family and friends know I'm a die hard traveling lover! I've been a few places in life but not as many as I would like. Since having my son and being a stay at home Mama doesn't leave me with much room and/or budget to travel anymore I decided that I would bring all the country's and different places of the world I would love to visit to me. How was I to do this though? Well, I started thinking about ONE of my favorite things about traveling and that is trying so many different types of new foods and that my Dearest Reader's, led me to this...
I had the fabulous idea to start cooking a traditional meal from another part of the world once a week.
Tonight was the first time I did it and I made Irish Stew!
I have to say this was the best stew I've ever had in my life. I can't explain how delicious it was.
I guess you'll just have to make it to find out for yourself.
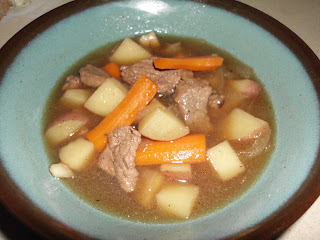
I went off of a recipe that I found but I didn't follow it to a "T".
I really just used it as guild lines to follow.
Ingredients:
Sunflower Seed Oil
2 lbs. of Beef Stew Meat (You're suppose to use Lamb but I couldn't find any today.)
7 Sprigs of Thyme
2 Bay Leaves
6 Carrots (peeled, cut into 2 inch halves)
2 lbs. of Red Potatoes
1 Large Yellow Onion (chopped), (I was to use the white and light green parts of Shallots.)
2 Tbsp. of Worcestershire
Salt and Pepper
Water.
Directions:
Put about 1-2 Tbsp. of sunflower seed oil into a large frying pan, brown your meat with half of the large yellow onion, thyme, salt and pepper. When your meat is cooked, pick out the thyme and add about 1 1/2 cups of water and stir up all the juices, I used this as my stock. Peel and chop your potatoes, carrots and other half of raw onion. Pour and mix your veggies, meat, stock, worcestershire and bay leaves into a baking dish. I had to use a 9x13 and it was FULL. Fill your dish with water until all the ingredients are right at being covered with water. (I set my dish on top of a cookie sheet just in case it decided to boil over, my baking dish was almost filled to the top.) Cover with foil.
Put into the oven at 375 degree F. Bake for about 1 1/2 to 2 hours or until your potatoes and carrots are tender.
You could also make this in a crock pot, I would estimate the cooking time to be around 4-5 hours on high.
OR
You could also make this in a pot on top of the stove on medium to medium-high heat and stirring so the veggies don't stick to the bottom.
This was so easy and simple to make. I know the next time I make this I want to try and find some lamb instead of beef and I think the next time I'm going to add cabbage to it as well.
I hope you and your family enjoy this as much as mine did!
Mm mm yummy!
I had the fabulous idea to start cooking a traditional meal from another part of the world once a week.
Tonight was the first time I did it and I made Irish Stew!
I have to say this was the best stew I've ever had in my life. I can't explain how delicious it was.
I guess you'll just have to make it to find out for yourself.

I went off of a recipe that I found but I didn't follow it to a "T".
I really just used it as guild lines to follow.
Ingredients:
Sunflower Seed Oil
2 lbs. of Beef Stew Meat (You're suppose to use Lamb but I couldn't find any today.)
7 Sprigs of Thyme
2 Bay Leaves
6 Carrots (peeled, cut into 2 inch halves)
2 lbs. of Red Potatoes
1 Large Yellow Onion (chopped), (I was to use the white and light green parts of Shallots.)
2 Tbsp. of Worcestershire
Salt and Pepper
Water.
Directions:
Put about 1-2 Tbsp. of sunflower seed oil into a large frying pan, brown your meat with half of the large yellow onion, thyme, salt and pepper. When your meat is cooked, pick out the thyme and add about 1 1/2 cups of water and stir up all the juices, I used this as my stock. Peel and chop your potatoes, carrots and other half of raw onion. Pour and mix your veggies, meat, stock, worcestershire and bay leaves into a baking dish. I had to use a 9x13 and it was FULL. Fill your dish with water until all the ingredients are right at being covered with water. (I set my dish on top of a cookie sheet just in case it decided to boil over, my baking dish was almost filled to the top.) Cover with foil.
Put into the oven at 375 degree F. Bake for about 1 1/2 to 2 hours or until your potatoes and carrots are tender.
You could also make this in a crock pot, I would estimate the cooking time to be around 4-5 hours on high.
OR
You could also make this in a pot on top of the stove on medium to medium-high heat and stirring so the veggies don't stick to the bottom.
This was so easy and simple to make. I know the next time I make this I want to try and find some lamb instead of beef and I think the next time I'm going to add cabbage to it as well.
I hope you and your family enjoy this as much as mine did!
Mm mm yummy!
Monday, September 10, 2012
My new addition to my living room!
So I have to start off by saying I have the greatest neighbor of all time.
She decided months ago that she would give me this beautiful piece of furniture but she couldn't find the key for the two cabinet doors for the longest time. Well... She found it and here it is in my living room! I really cannot wait to go to the store tomorrow and get some Murphy's Oil Soap and Liquid Gold so I can clean it up. There are a few places where the nails need fixing but I think David wants to help me fix it up so I suppose I'll leave that to him.
I can't remember exactly but I think my neighbor told me this is made out of Walnut.
I'll have to ask her about it again.
Either way... I love it!
It's funny too, I drew up a sketch of a "dream cabinet" for my crafting supplies so my little one can't get into them and also I would like them organized for once. Well, I put that sketch on my bulletin/wish board and I finally got it. I was just going to build one but now I have this beaut and it didn't even cost me a penny! Oh, free stuff! Eek!
When I'm finished with the mild restoring I'll post before and after pictures, but for now here it is!
My beautiful dresser/cabinet that's going to save my desk for all the crafting clutter!

She decided months ago that she would give me this beautiful piece of furniture but she couldn't find the key for the two cabinet doors for the longest time. Well... She found it and here it is in my living room! I really cannot wait to go to the store tomorrow and get some Murphy's Oil Soap and Liquid Gold so I can clean it up. There are a few places where the nails need fixing but I think David wants to help me fix it up so I suppose I'll leave that to him.
I can't remember exactly but I think my neighbor told me this is made out of Walnut.
I'll have to ask her about it again.
Either way... I love it!
It's funny too, I drew up a sketch of a "dream cabinet" for my crafting supplies so my little one can't get into them and also I would like them organized for once. Well, I put that sketch on my bulletin/wish board and I finally got it. I was just going to build one but now I have this beaut and it didn't even cost me a penny! Oh, free stuff! Eek!
When I'm finished with the mild restoring I'll post before and after pictures, but for now here it is!
My beautiful dresser/cabinet that's going to save my desk for all the crafting clutter!

Tuesday, August 21, 2012
3, 2, 1, Cake in a Cup
So this past Sunday I was over my sisters place and she kept raving about this 3, 2, 1, Cake in a Cup. She wanted to make me some but after hearing how it was made I wasn't to crazy about the idea of it so I declined several times until she finally just made me some and I felt like I had no choice but to try it. Never again will I refuse to have any because this stuff is seriously delicious!
It's the best little snack ever because it's cheap, makes loads of it, fast, simple AND the bestest part is my sister said a single serving is 20 calories!!!
What!?! I can eat Chocolate cake and it's less calories then those expensive card board and saw dust 100 calorie snack packs?? Holy ships and cows! You know this girl is excited!!!
I don't know where my big sis got the recipe from so I can't give credit to where credit is do but regardless I have to share this with all my girlfriends!
That's it! Like I said CHEAP and EASY!!!


Side Note: This isn't a picture of a full batch.
I gave my chocoholic neighbor a small container of some.


Try adding berries, nuts or if you're not worried about your calorie intake then you could add icing, chocolate syrup, chocolate and/or peanut butter chips, or a little whip cream.
Have fun with it. So far my favorite topping is a teaspoon of chocolate syrup. Mmmm!
What makes this even better. Just think...
It's the best little snack ever because it's cheap, makes loads of it, fast, simple AND the bestest part is my sister said a single serving is 20 calories!!!
What!?! I can eat Chocolate cake and it's less calories then those expensive card board and saw dust 100 calorie snack packs?? Holy ships and cows! You know this girl is excited!!!
I don't know where my big sis got the recipe from so I can't give credit to where credit is do but regardless I have to share this with all my girlfriends!
There are only 3 ingredients,
1 box of Angel Food Cake,
1 box of Your favorite flavored cake
and 2 Tbsp. of Water.
1 box of Angel Food Cake,
1 box of Your favorite flavored cake
and 2 Tbsp. of Water.
That's it! Like I said CHEAP and EASY!!!
Of course I love chocolate so Chocolate Fudge Cake is my favorite choice!

In a large bowl, mix together your cake mixes until they are completely combined.
.
.

Side Note: Remember you HAVE to have 1 box of Angel Food.
You cannot substitute it out for anything else.
You cannot substitute it out for anything else.

Once it's all combined, put your mix into some sort of storage container.
Luckily I had one of my pretty jars empty.
Luckily I had one of my pretty jars empty.
Side Note: This isn't a picture of a full batch.
I gave my chocoholic neighbor a small container of some.

Ok, here's where the 3, 2, 1, comes into play.
Put 3 Tbsp. of your mix into a coffee cup or mug.

Then add 2 Tbsp. of Water.

Mix together, make sure you dig up the bottom so you aren't left with
any dry mix down there once you start eating it.
any dry mix down there once you start eating it.

It should look like this.

Put your cup into the microwave for 1 minute.

Presto!!!
You're ready to indulge yourself in a 20 calorie snack!
You're ready to indulge yourself in a 20 calorie snack!
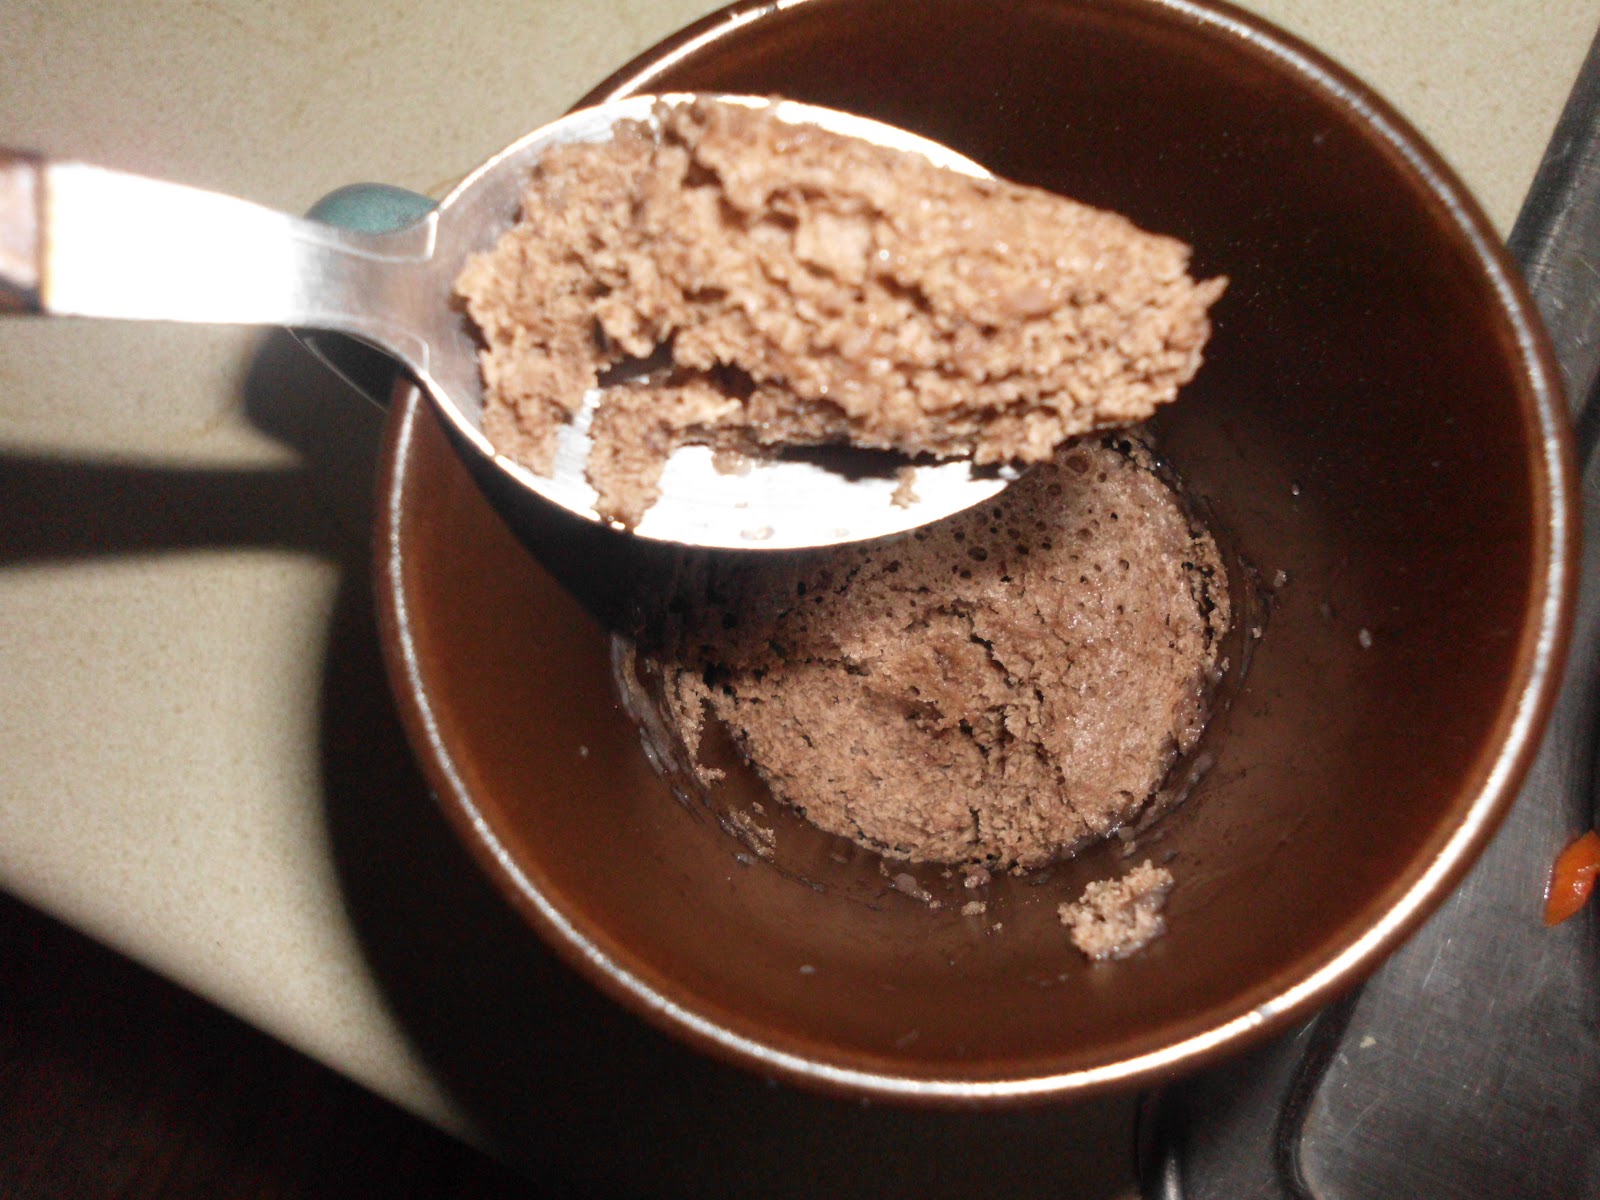
I like mine a little under done because it's a little bit more moist and gooey that way.
So I microwave mine for about 45 seconds but just play around and experiment with it.Try adding berries, nuts or if you're not worried about your calorie intake then you could add icing, chocolate syrup, chocolate and/or peanut butter chips, or a little whip cream.
Have fun with it. So far my favorite topping is a teaspoon of chocolate syrup. Mmmm!
They say you should have a snack that doesn't exceed 100 calories right?
So technically you're able to have 5 (plain) cups of this at a time. ;)
No more saying "No" to chocolate cake ever again!
Life is good, isn't it?
Enjoy!
I am so sorry, I just found out about that someone else had stated that the nutritional value for a cup of cake is actually 100 calories, 23 carbs and 1 protein per serving.
This comes to a very big disappointment to me. Well, at least it doesn't exceed over 100 calories per serving. So sorry for the miss information!!!
This comes to a very big disappointment to me. Well, at least it doesn't exceed over 100 calories per serving. So sorry for the miss information!!!
Subscribe to:
Posts (Atom)