My sister Danielle at Simple Sapphire is going to bring a sweet bundle of baby girl joy into this world in a few months. This will be my first niece and I couldn't be more excited for her arrival!
1) A new baby in the family is always an amazing blessing.
2) I LOVE BABIES!
3) It's A Girl!
I have nephews and a son so it's just about time for a little dresses, bows and butterflies!
I am going to be throwing my wonderful sister a baby shower in March so I'll be flaunting fabulous baby shower tutorials and ideas!
Today I went over to her place and we started planning and writing down lists. I love planning and lists!
We came up with the perfect baby shower theme for the blissful season of Spring, a menu, guest list, gift bags, thank you cards, classic games and we even made up a few ourselves! They probably have been done before but neither one of us has seen them on baby shower game idea lists or have played them at past showers. We also thought of some adorable/fun/fantastic prizes for the game winners.
Are you excited yet? Just wait, keep reading!
I will be throwing this shower on a budget, therefore I'll be sharing a thick spread of advice and tips on how to create a beautifully decorated shower that will be fun for the mommy to be and all guests attending for nickles and dimes!
Also, Danielle and I are both very creative and crafty gals, so I'll be sharing some incredible DIY projects!
What about now... Are you excited? You are aren't you!?!
If not then you need to go bungee jumping or sky diving to get that unamused heart racing. tehehe
I won't be leaking any of the inside scoop until March. You'll just have to check back then.
If you have any side effects from your prolonged excitement, you can always check out my pins here and follow me on pinterest, keep reading past, present and future entries here at My Discovered Thoughts (be sure to follow my entries so you don't miss out) and don't forget to check out and follow my lovely sister Danielle at Simple Sapphire.
Stay tuned and have a blessed day!

Showing posts with label Tutorial. Show all posts
Showing posts with label Tutorial. Show all posts
Friday, February 1, 2013

Monday, October 29, 2012
Tea Dyeing Tutorial
After doing a tea dyeing test run on a white t-shirt, I knew that tea dyeing a pair of old tube socks would be perfect for my sons Halloween costume.
What you'll need:
8-10 tea bags,
Pot of boiling water,
White cotton fabric,
and a spoon or tongs.
Instructions:
I used a cheap tea that I've had forever!
I wouldn't spend a lot of money on the tea, it all stains the same so go to the dollar store. I'm pretty sure I bought this box of tea at Wal-Mart and it was super cheap.
I'm not sure how many bags you'll really need, I used 8 bags for a pair of tube socks but when I did the test run on a white t-shirt I used 15. If you want a pretty medium brownish tan hue then I would use more bags, just to be on the safe side.
It's a good idea to tie your tea bags together, it makes them a lot easier to handle.
I wouldn't spend a lot of money on the tea, it all stains the same so go to the dollar store. I'm pretty sure I bought this box of tea at Wal-Mart and it was super cheap.
I'm not sure how many bags you'll really need, I used 8 bags for a pair of tube socks but when I did the test run on a white t-shirt I used 15. If you want a pretty medium brownish tan hue then I would use more bags, just to be on the safe side.
It's a good idea to tie your tea bags together, it makes them a lot easier to handle.

Depending on the amount of fabric you're using you'll need a medium pot of boiling water.
You want the least possible amount of water. The less water, the darker your tea will be.
You want the least possible amount of water. The less water, the darker your tea will be.
Once your water is boiling, take it off the hot burner and start steeping your tea bags.

Once you've achieved a dark murky color, discard the tea bags and insert your fabric and use a spoon or tongs to push your fabric down into the water and make sure it's all covered. If you have any spots that keep floating to the top, you'll have to stand there and keep pushing them down because if it's above the water line, that part of the fabric will not stain evenly or at all.

This is what the tube socks looked like as I was letting them set.
I waited about 10-15 minutes for them to set. The longer you wait the darker the hue will be. You can wait over night if you think it best.
You can also reuse the old coffee grinds from your coffee pot to make a richer hue.
I didn't use coffee with the socks but I played around with it on that "test run t-shirt" that I keep mentioning. It's a little difficult to manage because coffee filters aren't enclosed and you don't want coffee grinds in your water.
I waited about 10-15 minutes for them to set. The longer you wait the darker the hue will be. You can wait over night if you think it best.
You can also reuse the old coffee grinds from your coffee pot to make a richer hue.
I didn't use coffee with the socks but I played around with it on that "test run t-shirt" that I keep mentioning. It's a little difficult to manage because coffee filters aren't enclosed and you don't want coffee grinds in your water.

Approximately 10-15 minutes later I CAREFULLY removed the socks from the HOT water.
I poured the water out of the pot as I held the socks in the pot with my spoon and ran cold water into the pot to cool them off and then rung them out and threw them into the drier by them self. I didn't want to chance staining my other clothes.
This is actually a terrible picture because the flash was to bright on my camera therefore making them look lighter then what they really are.
I poured the water out of the pot as I held the socks in the pot with my spoon and ran cold water into the pot to cool them off and then rung them out and threw them into the drier by them self. I didn't want to chance staining my other clothes.
This is actually a terrible picture because the flash was to bright on my camera therefore making them look lighter then what they really are.

There you have it. It's that simple.
Just a quick side note though, you should always try this dyeing method on a piece of cotton fabric that you can live without. It would be terrible if you tried dyeing your favorite shirt and ended up not liking the color. Also, I have NO idea how this dyeing method works on any other fabrics. I have only used it on cotton.
I hope you've enjoyed this tutorial and that you'll have fun tea dyeing.
Saturday, October 13, 2012
DIY Diaper Cake
I was cleaning off my desk the other day and came a crossed an invitation to my friends baby shower that I had completely forgotten about.
Panic starts to set in!
Oh, holy crap!!! What in the world am I going to do with no time or budget to pick up a great gift?
I'm always so thoughtful and creative and I feel as if I ALWAYS have to be when giving gifts and plus it's for someone that was very thoughtful at my baby shower. I was excited about it when I first received the invitation but with lack of much needed sleep, my 1 year old running circles around me all day and trying to get all my house hold chores done it had easily slipped my mind. What was I to do with "no notice"? I need time to budget myself, save money, figure out what the mother to be needs and/or wants, plan what and how to present my gift, should I buy and put everything into a basket, tray, diaper bag, I GOT IT! A DIAPER CAKE!
It's cheap, easy and fool proof!!!
I could only afford to spend $25.00. Yikes, that doesn't seem like a lot of money when we're talking about a baby shower gift. Everyone knows how expensive baby stuff is unless you're a smart shopping, budgeting Momma like myself.
I went to Dollar General. Yes, I bought supplies for a baby shower gift at the dollar store.
Don't judge, be impressed!
Diaper cakes are super simple and easy.
The supplies that you'll need are:
(These are the items I bought today that were suited to the mother to be needs, but you can pretty much get whatever. Your options are endless!)
Diapers, (I used 50 diapers.) (the bigger count of diapers you buy the bigger your cake.)
Baby Wipes,
Bordeaux's Butt Paste,
Healthcare Kit, (medicine spoon, thermometer, nose cleaner, nail clippers, etc.)
Teething Ring,
Teething Tablets,
Rubber Bands, (make sure you have enough for each diaper and a few extra.)
Card Board,
Pen,
Scissors,
Card Board from a Toilet Paper Roll or Paper Towel Roll,
(paper towel roll is going to be your better option.)
Duct Tape,
Ribbon,
Curling Ribbon,
Card Stock
Gift Bag,
Tissue Paper.
Keep in mind, this isn't the "only" way to make a diaper cake, it's just the way I was able to make mine. I used what I had around the house so I could save some pennies.
No harm, no shame. It's what the mother to be needs and it looks really cute, so who cares.
Instructions:
Start out by rolling up the diapers. You'll want to lay the diaper front side down and with the top part of the diaper closest to you and roll and use a rubber band to keep them secure. Depending on how big your rubber bands are you may have to wrap them around the diaper and couple of times. I only needed to wrap it twice and be sure that the rubber band is in the middle of diapers.


I used 16 diapers for my top layer and 34 diapers for my bottom layer.
If you're making a cake just like mine take 16 already rolled up diapers and rubber band them all together with 1 rubber band. The rubber band needs to lay a crossed the rubber bands on the diapers. There's no need to wrap the rubber band twice around the layers, it should be secure enough to keep them all together.
And then do the same to the other 34 rolled up diapers.
Make sure that the outside of your layers aren't showing the ending rolled edge of the diapers.
It's easier to rubber band your rolls together and then turn any diaper rolls around.
This way the cake will have a clean, even look to it.
(See the 5th picture down from here to see what I mean.)
You'll need a platform for the bottom layer of your cake so when you pick it up it won't fall apart.
I didn't have anything special around the house so I used a card board diaper box that my sons diapers came in.
I broke the box down at the glued areas and opened it and laid it flat.
I then took my 34 ct. bottom layer of diapers and set it on top of the box and drew a circle around the layer as close to it as I could possibly get without getting ink on the diapers.
You could use a pencil for your circle outline but I wanted to be able to clearly see my marking.
 Cut out your circle outline.
You'll want to cut about 1 - 2 inches inside and all the way around your circle, that way you won't be able to see the card board when you put your bottom layer over it.
Then you'll duct tape a toilet paper or paper towel roll in the middle of your card board circle.
 My toilet paper roll is actually centered, my circle is just a bit lop sided because my scissors broke and I had to use a knife to cut my platform out.

I used a toilet paper roll because I didn't have a paper towel roll. Toilet paper rolls are long/short enough for 1 layer. Since I didn't have a paper towel roll. I cut off one of the longer flaps on the diaper box that I used to make my circle platform. I then bent the flap long ways to try and make a rod and rubber banded both ends together. I slipped my "card board rod" into the toilet paper roll hole, and placed the top layer of diapers over the "rod".
Try to center the card board the best you can in the middle of your diapers.


This is where it gets really fun!
Wrap your ribbon around the middle of each layer where you have your rubber band line and tie a pretty bow.
I then put the Teething Tablets on the top front of the bottom layer and tucked the top flap part of the box under the top layer bow. (Look at the picture and you'll see what I mean.)
I also had a few tiny plastic clothes pins that a friend gave me for my baby shower, I clipped them on the box flap and the top part of the bow on the top layer so it looks like there at holding up the box.
I also clipped tiny plastic baby bottles with ribbons glued to them onto the bottom layer bow with the tiny clothes pins.
You don't have to use embellishments, I did because I had them laying around the house.
I then took the Bordeaux's Butt Paste and stuffed it down the middle of the top layer of diapers right above where my "card board rod" is and then set the Teething Ring tilted on the front of it.
Last but not least.
I made a little note card to put on the cake.
I measured out a 3"x6" Card Stock strip and folded it in half and I recently bought a fancy little Martha Stewart paper punch (on clearance and saved $10. on it at Hobby Lobby! I love a great deal!!!) and with the card folded in half I punched along the top and bottom edges of the card.
I then punched a small hole in the side of it by the fold line with a hole punch and tied it to the top layer bow with curling ribbon. Honestly you could use any type of ribbon or string that you have around the house. Remember, saving pennies is a good thing... For anyone.

That's it. The diaper cake is finished and for the Baby Wipes and Healthcare Kit...
I didn't have enough room on the cake for them so I put them in a gift bag with tissue paper that I also had laying around the house and made a tag that looks the same as the one on the diaper cake and a pretty curling ribbon bow and put them on the gift bag..
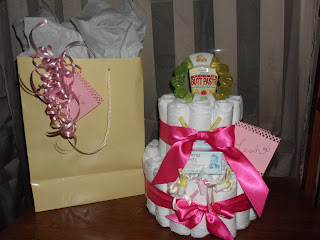 I really like it when I'm able to save little things like gift bags, ribbons, party embellishments, etc. etc. I recommend it to everyone as long as you have a place to keep it neatly organized. If you're not organized about little things like that then when the time comes to use it you probably won't be able to find it. So therefore, what's the point in having it if not to use?
I'm not the most organized person (lack of space) but I do keep all my party embellishments and supplies all together so I'll know exactly where I find them.
Thank God too, I would have spent more money then what my budget called for or wouldn't have been able to get my friend as much stuff as I did.
I hope this tutorial has inspired you in same way.
Panic starts to set in!
Oh, holy crap!!! What in the world am I going to do with no time or budget to pick up a great gift?
I'm always so thoughtful and creative and I feel as if I ALWAYS have to be when giving gifts and plus it's for someone that was very thoughtful at my baby shower. I was excited about it when I first received the invitation but with lack of much needed sleep, my 1 year old running circles around me all day and trying to get all my house hold chores done it had easily slipped my mind. What was I to do with "no notice"? I need time to budget myself, save money, figure out what the mother to be needs and/or wants, plan what and how to present my gift, should I buy and put everything into a basket, tray, diaper bag, I GOT IT! A DIAPER CAKE!
It's cheap, easy and fool proof!!!
I could only afford to spend $25.00. Yikes, that doesn't seem like a lot of money when we're talking about a baby shower gift. Everyone knows how expensive baby stuff is unless you're a smart shopping, budgeting Momma like myself.
I went to Dollar General. Yes, I bought supplies for a baby shower gift at the dollar store.
Don't judge, be impressed!
Diaper cakes are super simple and easy.
The supplies that you'll need are:
(These are the items I bought today that were suited to the mother to be needs, but you can pretty much get whatever. Your options are endless!)
Diapers, (I used 50 diapers.) (the bigger count of diapers you buy the bigger your cake.)
Baby Wipes,
Bordeaux's Butt Paste,
Healthcare Kit, (medicine spoon, thermometer, nose cleaner, nail clippers, etc.)
Teething Ring,
Teething Tablets,
Rubber Bands, (make sure you have enough for each diaper and a few extra.)
Card Board,
Pen,
Scissors,
Card Board from a Toilet Paper Roll or Paper Towel Roll,
(paper towel roll is going to be your better option.)
Duct Tape,
Ribbon,
Curling Ribbon,
Card Stock
Gift Bag,
Tissue Paper.
Keep in mind, this isn't the "only" way to make a diaper cake, it's just the way I was able to make mine. I used what I had around the house so I could save some pennies.
No harm, no shame. It's what the mother to be needs and it looks really cute, so who cares.
Instructions:
Start out by rolling up the diapers. You'll want to lay the diaper front side down and with the top part of the diaper closest to you and roll and use a rubber band to keep them secure. Depending on how big your rubber bands are you may have to wrap them around the diaper and couple of times. I only needed to wrap it twice and be sure that the rubber band is in the middle of diapers.


I used 16 diapers for my top layer and 34 diapers for my bottom layer.
If you're making a cake just like mine take 16 already rolled up diapers and rubber band them all together with 1 rubber band. The rubber band needs to lay a crossed the rubber bands on the diapers. There's no need to wrap the rubber band twice around the layers, it should be secure enough to keep them all together.
And then do the same to the other 34 rolled up diapers.
Make sure that the outside of your layers aren't showing the ending rolled edge of the diapers.
It's easier to rubber band your rolls together and then turn any diaper rolls around.
This way the cake will have a clean, even look to it.
(See the 5th picture down from here to see what I mean.)
You'll need a platform for the bottom layer of your cake so when you pick it up it won't fall apart.
I didn't have anything special around the house so I used a card board diaper box that my sons diapers came in.
I broke the box down at the glued areas and opened it and laid it flat.
I then took my 34 ct. bottom layer of diapers and set it on top of the box and drew a circle around the layer as close to it as I could possibly get without getting ink on the diapers.
You could use a pencil for your circle outline but I wanted to be able to clearly see my marking.

You'll want to cut about 1 - 2 inches inside and all the way around your circle, that way you won't be able to see the card board when you put your bottom layer over it.
Then you'll duct tape a toilet paper or paper towel roll in the middle of your card board circle.


Try to center the card board the best you can in the middle of your diapers.


This is where it gets really fun!
Wrap your ribbon around the middle of each layer where you have your rubber band line and tie a pretty bow.
I then put the Teething Tablets on the top front of the bottom layer and tucked the top flap part of the box under the top layer bow. (Look at the picture and you'll see what I mean.)
I also had a few tiny plastic clothes pins that a friend gave me for my baby shower, I clipped them on the box flap and the top part of the bow on the top layer so it looks like there at holding up the box.
I also clipped tiny plastic baby bottles with ribbons glued to them onto the bottom layer bow with the tiny clothes pins.
You don't have to use embellishments, I did because I had them laying around the house.
I then took the Bordeaux's Butt Paste and stuffed it down the middle of the top layer of diapers right above where my "card board rod" is and then set the Teething Ring tilted on the front of it.
Last but not least.
I made a little note card to put on the cake.
I measured out a 3"x6" Card Stock strip and folded it in half and I recently bought a fancy little Martha Stewart paper punch (on clearance and saved $10. on it at Hobby Lobby! I love a great deal!!!) and with the card folded in half I punched along the top and bottom edges of the card.
I then punched a small hole in the side of it by the fold line with a hole punch and tied it to the top layer bow with curling ribbon. Honestly you could use any type of ribbon or string that you have around the house. Remember, saving pennies is a good thing... For anyone.

That's it. The diaper cake is finished and for the Baby Wipes and Healthcare Kit...
I didn't have enough room on the cake for them so I put them in a gift bag with tissue paper that I also had laying around the house and made a tag that looks the same as the one on the diaper cake and a pretty curling ribbon bow and put them on the gift bag..

I'm not the most organized person (lack of space) but I do keep all my party embellishments and supplies all together so I'll know exactly where I find them.
Thank God too, I would have spent more money then what my budget called for or wouldn't have been able to get my friend as much stuff as I did.
I hope this tutorial has inspired you in same way.
Tuesday, August 21, 2012
3, 2, 1, Cake in a Cup
So this past Sunday I was over my sisters place and she kept raving about this 3, 2, 1, Cake in a Cup. She wanted to make me some but after hearing how it was made I wasn't to crazy about the idea of it so I declined several times until she finally just made me some and I felt like I had no choice but to try it. Never again will I refuse to have any because this stuff is seriously delicious!
It's the best little snack ever because it's cheap, makes loads of it, fast, simple AND the bestest part is my sister said a single serving is 20 calories!!!
What!?! I can eat Chocolate cake and it's less calories then those expensive card board and saw dust 100 calorie snack packs?? Holy ships and cows! You know this girl is excited!!!
I don't know where my big sis got the recipe from so I can't give credit to where credit is do but regardless I have to share this with all my girlfriends!
That's it! Like I said CHEAP and EASY!!!


Side Note: This isn't a picture of a full batch.
I gave my chocoholic neighbor a small container of some.


Try adding berries, nuts or if you're not worried about your calorie intake then you could add icing, chocolate syrup, chocolate and/or peanut butter chips, or a little whip cream.
Have fun with it. So far my favorite topping is a teaspoon of chocolate syrup. Mmmm!
What makes this even better. Just think...
It's the best little snack ever because it's cheap, makes loads of it, fast, simple AND the bestest part is my sister said a single serving is 20 calories!!!
What!?! I can eat Chocolate cake and it's less calories then those expensive card board and saw dust 100 calorie snack packs?? Holy ships and cows! You know this girl is excited!!!
I don't know where my big sis got the recipe from so I can't give credit to where credit is do but regardless I have to share this with all my girlfriends!
There are only 3 ingredients,
1 box of Angel Food Cake,
1 box of Your favorite flavored cake
and 2 Tbsp. of Water.
1 box of Angel Food Cake,
1 box of Your favorite flavored cake
and 2 Tbsp. of Water.
That's it! Like I said CHEAP and EASY!!!
Of course I love chocolate so Chocolate Fudge Cake is my favorite choice!

In a large bowl, mix together your cake mixes until they are completely combined.
.
.

Side Note: Remember you HAVE to have 1 box of Angel Food.
You cannot substitute it out for anything else.
You cannot substitute it out for anything else.

Once it's all combined, put your mix into some sort of storage container.
Luckily I had one of my pretty jars empty.
Luckily I had one of my pretty jars empty.
Side Note: This isn't a picture of a full batch.
I gave my chocoholic neighbor a small container of some.

Ok, here's where the 3, 2, 1, comes into play.
Put 3 Tbsp. of your mix into a coffee cup or mug.

Then add 2 Tbsp. of Water.

Mix together, make sure you dig up the bottom so you aren't left with
any dry mix down there once you start eating it.
any dry mix down there once you start eating it.

It should look like this.

Put your cup into the microwave for 1 minute.

Presto!!!
You're ready to indulge yourself in a 20 calorie snack!
You're ready to indulge yourself in a 20 calorie snack!
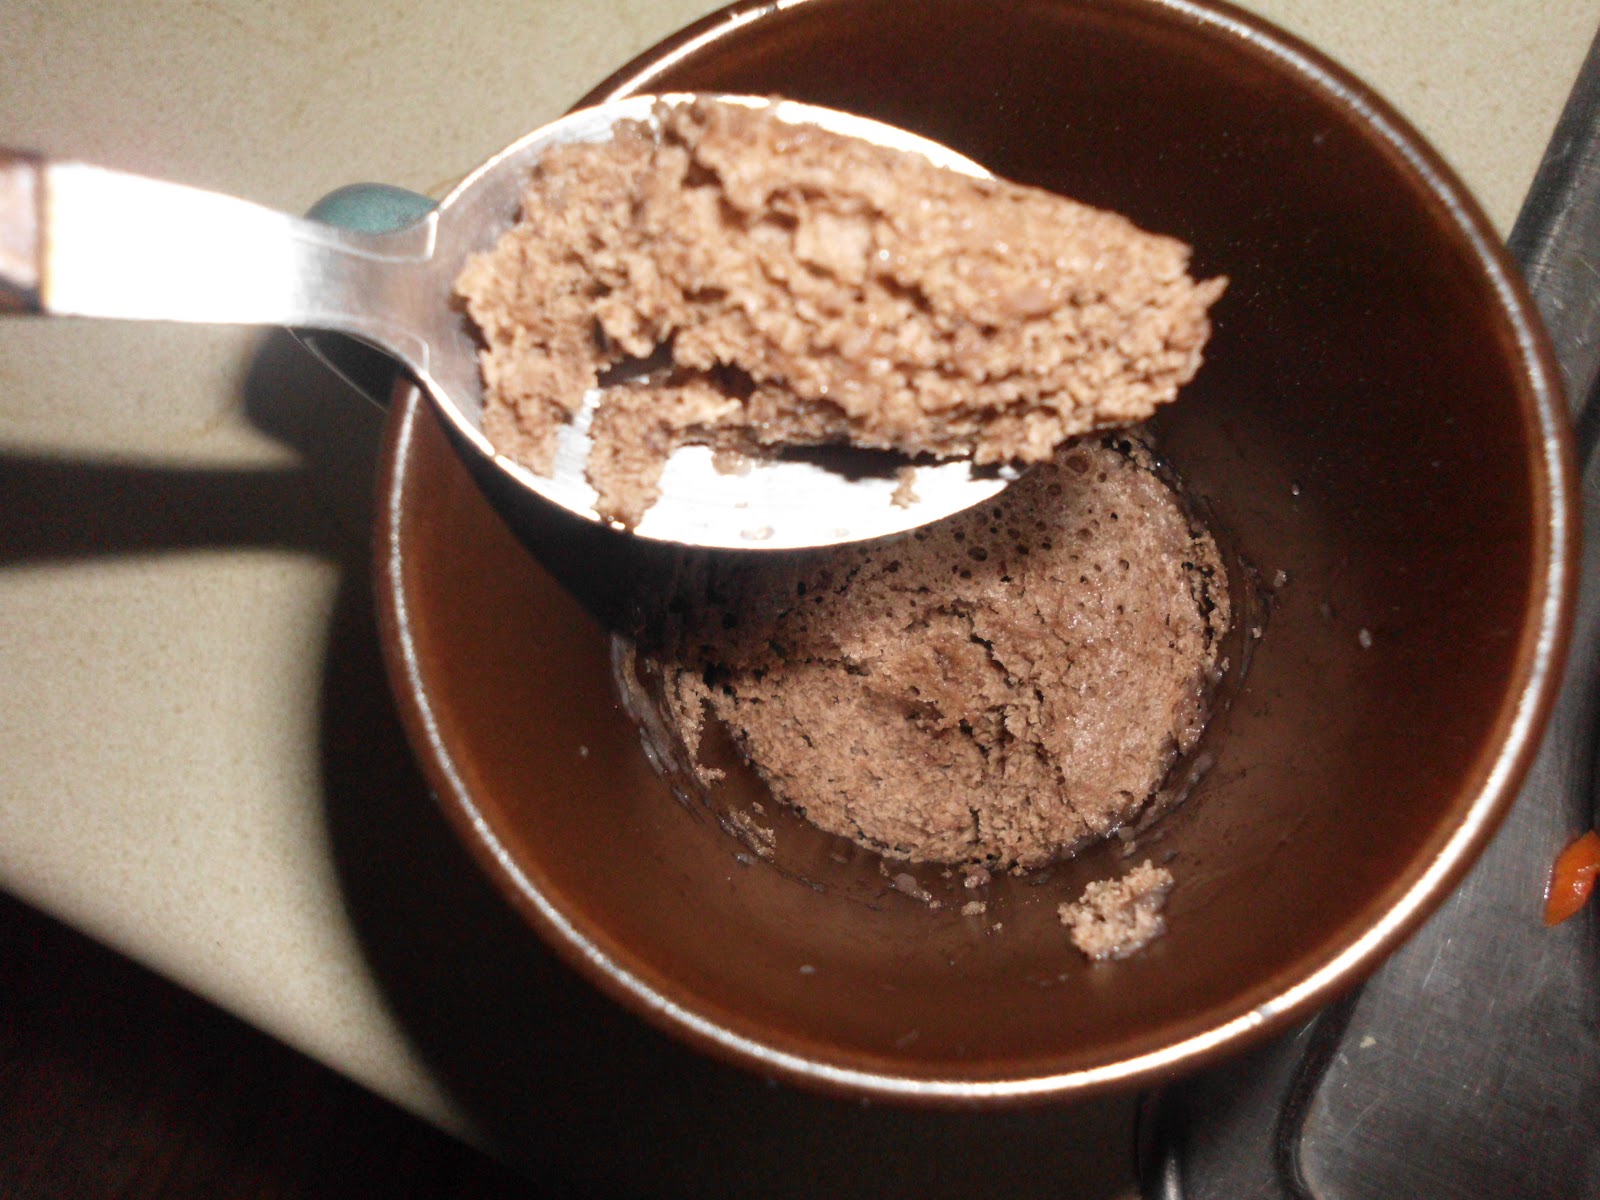
I like mine a little under done because it's a little bit more moist and gooey that way.
So I microwave mine for about 45 seconds but just play around and experiment with it.Try adding berries, nuts or if you're not worried about your calorie intake then you could add icing, chocolate syrup, chocolate and/or peanut butter chips, or a little whip cream.
Have fun with it. So far my favorite topping is a teaspoon of chocolate syrup. Mmmm!
They say you should have a snack that doesn't exceed 100 calories right?
So technically you're able to have 5 (plain) cups of this at a time. ;)
No more saying "No" to chocolate cake ever again!
Life is good, isn't it?
Enjoy!
I am so sorry, I just found out about that someone else had stated that the nutritional value for a cup of cake is actually 100 calories, 23 carbs and 1 protein per serving.
This comes to a very big disappointment to me. Well, at least it doesn't exceed over 100 calories per serving. So sorry for the miss information!!!
This comes to a very big disappointment to me. Well, at least it doesn't exceed over 100 calories per serving. So sorry for the miss information!!!
Sunday, November 20, 2011
Crafty - Christmas Stocking
I was wanting to make a photo tutorial but I'm super tired and figured it was pretty self explanatory. Anyways.... David needed a Christmas stocking to take up to work and I got all excited and decided to make him one and this is what I came up with.
I used cookies cutters to make outlines of the shapes and cut them out. Then I hand stitched on the characteristics of each shape with sewing floss. Stitched the shapes onto the stocking with the same type of floss (I didn't use any glue). The last step was writing the name at the top of the stock and adding a little decoration with the glitter glue pens. Very easy, very simple.
Supplies:
Red Felt Stocking,
White, Glitter White, Green and Brown Felt,
Scissors,
Yarn Needle,
White, Black, Red, Yellow, Brown, Orange, and Green Sewing Floss,
Cookie Cutters,
Pen,
Red, Gold and Green Glitter Glue Pens,
*Fun Tip!*
To get a craftier look and a little more depth I like to use two different colors of floss at the same time depending on what I'm stitching. For instance: The star on top of the Christmas tree I used White and Yellow floss, the Ginger Bread Man's mint looking buttons I used Red and White and The Snowmans Pipe is Yellow and Brown so it'd look more like a corncob pipe.

I used cookies cutters to make outlines of the shapes and cut them out. Then I hand stitched on the characteristics of each shape with sewing floss. Stitched the shapes onto the stocking with the same type of floss (I didn't use any glue). The last step was writing the name at the top of the stock and adding a little decoration with the glitter glue pens. Very easy, very simple.
Supplies:
Red Felt Stocking,
White, Glitter White, Green and Brown Felt,
Scissors,
Yarn Needle,
White, Black, Red, Yellow, Brown, Orange, and Green Sewing Floss,
Cookie Cutters,
Pen,
Red, Gold and Green Glitter Glue Pens,
*Fun Tip!*
To get a craftier look and a little more depth I like to use two different colors of floss at the same time depending on what I'm stitching. For instance: The star on top of the Christmas tree I used White and Yellow floss, the Ginger Bread Man's mint looking buttons I used Red and White and The Snowmans Pipe is Yellow and Brown so it'd look more like a corncob pipe.

ENJOY! :)
Subscribe to:
Posts (Atom)