Wednesday, February 19, 2014

No time no post! - Mixed Media Art Fox

Tonight I was talking to a friend about hummus, then chick peas and then I started telling my friend about a salad I had made with chick peas so I sent her my blog link to the recipe.... then I realized that I haven't posted anything in exactly 1 whole year!!!
How did this happen? Where have I been?
My gosh.
It is time to get my blog back up and running again. I love sharing my recipes, DIY'ers, my mommy and family adventures and the simple bliss's in life that make me smile all in hope it will do the same to someone else or give someone some type of spark they have been searching for.
I have done so many different projects in the past year so I'll probably just post about what I have already done for a little while or until my next project. (Life is so busy, busy, busy!)


In the past 6 or 8 months I have gotten into making Mixed Media Art and I am getting obsessed! 
Here's one that I have recently done that I can't get enough of.


The picture isn't of the greatest quality but my camera is on a hiatus right now so I'm down to only using my phone to take pictures.

I will hopefully have more to come in the very near future if my brain doesn't run away again. 

Tuesday, February 19, 2013

DIY Painted & Stamped Knife Block

I'm still slowly but surely working on my kitchen.
Organizing and decorating it...

Tonight I finally brought myself to get into a craft project so I decided on a small, quick one.

My kitchen colors are varieties of greens, blues, and yellows.  There's already so many yellow tones (ugly walls) in my kitchen so I try to stay closer to greens and blues.
I'm going for a natural look with colors you would typically see on a warm sunny spring day in a garden.

Anyways...

Tonight I worked on my boring o'l knife block.
I love natural wood on just about everything but I've been tired of my knife block and it's boring look so I decided to paint and stamp it!

It was a breeze to start and finish and the paint I used took no time at all to dry, which always makes a project that much more fun to work with.  I'm not a very patient person when it comes to waiting on a project to set.  When I start, I want to get it done right then and there because I can be a terrible procrastinator!!


Tools Used:
Wooden Knife Block,
Sandpaper, (Don't know the grade)
Swiffer Cloth and Wet Wipe,
Cheap 1" Acrylic Paint Brush,
Americana Acrylic Paint, (Celery Green)
Paint Tray, (you can also use a piece of smooth plastic, wax paper or glass plate)
Stamps and Black Stampabilties Ink Pad.

1. I started out by sanding the block down on all sides to make sure I didn't have any rough and uneven spots and edges.  I also sanded off the brand name on the front of the block so it wouldn't interfere with my stamping on a later step.

2. I blew off as much sanding dust as possible then I took an off brand of Swiffer Cloth to it and rubbed it down to get the rest of the loose dust off.  After I did that I then wiped the block down with a baby wet wipe (because it was within arms reach).  You can use a damp dish rag or wash cloth.  As long as you get the remaining dust off of it you'll be just fine.

3. I let the block dry and started to paint it.  I highly recommend that you use strokes that go with the grain of the wood.  You'll end up with a better out come.  You'll also need to apply several coats of paint to it.  I applied about 3 coats on each side.  Each coat needs to fully dry before reapplying a new one.  If you keep painting over wet paint you'll (a.) end up with light spots where you'll be able to see the wood underneath, (b.) you'll get paint build up in areas, or (c.) BOTH!  Any or all of those won't be very flattering for your end result.  I used a nontoxic acrylic paint and I would suggest the same for yours as well.  After all, your knifes are going to be rubbing and touching parts of the paint and you wouldn't want toxins to get onto the knifes you'll be cutting and chopping your food with.  Ick!

4. Once you have all of your coats of paint on and it's completely dry you're ready to stamp.
Pick out which stamp you want to go with, test them on a piece of paper to ensure you're going to be happy with the out come, and then plan where you want to stamp it before you cover it with ink.
When you're ready to stamp your piece, lightly dab the stamp onto the ink pad and carefully stamp your piece in the desired area (or as close as you can get it) and let dry.
I used a scrap booking ink brand (Stampabilities) because of the fact it's nontoxic.

5. You'll want to find a nontoxic water proof sealer to cover the whole block in.
I have not sealed mine yet because I'm not sure what to use.
I thought about my off brand of Mod Podge but I'm not sure how well that product will stand up towards water.
My block is located right beside my kitchen sink and gets wet very quite frequently.
If you have any tips and/or suggestions I would love to read about them!

After you complete all 5 steps you'll be finished and ready to show it off as your new decorative kitchen piece.  I hope this was an enjoyable DIY tutorial and was easy to understand and follow.

God Bless and Keep Crafting!

Friday, February 1, 2013

Baby Shower Tutorials Coming Soon!

My sister Danielle at Simple Sapphire is going to bring a sweet bundle of baby girl joy into this world in a few months.  This will be my first niece and I couldn't be more excited for her arrival!
1) A new baby in the family is always an amazing blessing.
2) I LOVE BABIES!
3) It's A Girl!
I have nephews and a son so it's just about time for a little dresses, bows and butterflies!

I am going to be throwing my wonderful sister a baby shower in March so I'll be flaunting fabulous baby shower tutorials and ideas!

Today I went over to her place and we started planning and writing down lists.  I love planning and lists!
We came up with the perfect baby shower theme for the blissful season of Spring, a menu, guest list, gift bags, thank you cards, classic games and we even made up a few ourselves!  They probably have been done before but neither one of us has seen them on baby shower game idea lists or have played them at past showers.  We also thought of some adorable/fun/fantastic prizes for the game winners.

Are you excited yet?  Just wait, keep reading!

I will be throwing this shower on a budget, therefore I'll be sharing a thick spread of advice and tips on how to create a beautifully decorated shower that will be fun for the mommy to be and all guests attending for nickles and dimes!
Also, Danielle and I are both very creative and crafty gals, so I'll be sharing some incredible DIY projects!

What about now...  Are you excited?  You are aren't you!?!
If not then you need to go bungee jumping or sky diving to get that unamused heart racing. tehehe

I won't be leaking any of the inside scoop until March.  You'll just have to check back then.

If you have any side effects from your prolonged excitement, you can always check out my pins here and follow me on pinterest, keep reading past, present and future entries here at My Discovered Thoughts (be sure to follow my entries so you don't miss out) and don't forget to check out and follow my lovely sister Danielle at Simple Sapphire.

Stay tuned and have a blessed day!

Sunday, January 6, 2013

My very own Mediterranean Salad

I was on Pinterest and found 2 recipes that sounded good but had some ingredients that I'm not a huge fan of so I took the 2 recipes, combined some of them together and added a few of my own touches to it.

I have had a request for the recipe so this is for you Samantha!


Mediterranean Salad

1 15oz can of garbanzo Beans (Chickpeas) - drained and rinsed,
1/2 large Red Pepper - chopped,
1/4 large Red Onion - chopped,
large handful of Yellow Grape Tomatoes - halved,
handful of Kalamata Olives - sliced,
1 small/medium Cucumber - chopped,
handful of Traditional Feta Cheese,
handful of Almonds - chopped/lightly minced,
1 tablespoon of Mint - minced,
1 tablespoon of Basil - minced,
Extra Virgin Olive Oil - medium drizzle all over,
Red Wine Vinegar - heavy shake all over,
Sea Salt and Ground Black Peppercorn to season.

Combine vegetables and almonds into a medium bowl and drizzle with oil and vinegar, sprinkle with sea salt and ground black peppercorns and feta cheese, toss together and serve at room temperature or chilled, by it's self or over spinach and arugula leaves.
If you serve it with spinach and arugula I would recommend drizzling a little more oil and vinegar to moisten the leaves.

This recipe would be perfect to make for a spring or summer picnic or take to any type of get together.
I truly love making "clean food" for my family.  It's not only healthy but it's delicious!
It makes me feel so good eating it and serving it to my family.
I hope you and your family enjoy this recipe.  I know my family and I did!


Saturday, January 5, 2013

Today is my debut of turning 25!

Yep, today is my birthday and I am now 25.
My birthday finally falls on the weekend and I have NO idea how to celebrate it.
Honestly I kind of just want to stay home and chill but I do that every day so I feel like I should get my booty out of the house.  I would love to get a pedicure but not many salons are opened on the weekends here in my area which I find to be insane!  Who has the time during the week unless you work at night or not at all?  Just silly if you ask me.  I have contacted one salon and hopefully they'll get back to me with good news.  ::geee::  I'm not excited to be turning 25 but getting a pedi would put me into the celebration spirit.
And no, not excited to be 25.  I'm getting crows feet in the corners of my eyes and my over all skin isn't as youthful as it use to be and it's not only harder to lose weight but it takes longer to feel fit.
Oh goodness...  I know I'm 25 and not 50 but I just want to feel 21 again.  I suppose I have a long road ahead of me so let's think positive here.

My car insurance is going to go down now.  Saving money is always awesome!
I now have 25 years of wisdom and more to come.
I have been given the chance to be 25 which I know some that were not.
That one is a bit grim and gloomy but, it's true.
I have fine lines around my eyes but with the money I'll be saving on my car insurance I'll be able to get some fantastic Clinique products!  Oh, how I LOVE Clinique!  They were one of the best companies to work for because of all the free goodies!  I miss those goodies. :( haha
And...  I am...  ???...  I can...  ???...
Okay, I can't think of anything else at this time but I have a lot of be thankful for and I know I'm not truly as old as I feel.

Hmm...  Writing this posting has given me the idea of how to celebrate my birthday today.
Obviously I need some pampering so I'm going to see about getting a pedicure and having David go to the mall with me so he can buy me some Clinique products for my gift.  Yep, I think that's what my plan is going to be.  Okay, now I'm exciting!!!

Monday, December 31, 2012

Good-Bye 2012, Welcome 2013!

I've had me ups and downs this year but I have to say it was a pretty great one!
I have so much to be thankful for and I am truly blessed!

I have enjoyed watching my little one learn as he discovers and explores as he grows.
I've enjoyed growing even closer with the love of my life.
My family and I have made mistakes from which we have learned from.
We have made new memories which will now turn into old memories as we start this new year of 2013 and start making new ones.
Here's to looking forward with no regrets.
Opening new doors and closing old ones and
staying positive for a happy and bright year! 

I've been on a positivity kick lately and I have the goal of sticking to it.
I don't find the need to make resolutions if I stay positive because I believe when you give good actions, thoughts and words.  You will receive good actions, thoughts and words in return.

I hope you all have a very safe and Happy New Year!

DON'T DRINK AND DRIVE!


Tuesday, December 25, 2012

Pre Christmas Post...

So Sorry for the lack of updates.
I will post shortly.

This Christmas has sure given me a dizzy head, lack of breath and many, many set backs.

That all sounds very negative so I would like to clarify that I had the best Christmas of my life!
I cannot wait to post pictures and possibly videos....  I'm not sure about that one yet...  And also talk about the amazing joy of Christmas with an adorable 1 1/2 year old boy.

Merry Christmas and Happy New Year!

God Bless!

Wednesday, December 12, 2012

Christmas Lights and Milo's 1st Hair Cut

I have really been enjoying this Christmas season.  I've had quite the scattered brain though.  Every single project I've worked on is still in progress and I keep forgetting to take step by step pictures for tutorials.  I decided this year that I wasn't going to stress out about anything because I realize there seriously isn't any point in that so even though I'm completely scattered all over the place I'm still loving life and enjoying spending this Christmas season with my family.
So far I've started making, Gingerbread ornaments (which I have stated already), crochet Christmas lights, a rag quilt for my love.  I can't believe I've been able to keep that a secret so far.  I still want to make a wreath for my front door, candles covered in salt to look like icy snow (that probably won't happen), I have made little Christmas tree decorations that actually are finished.  haha Those are the only things that I've followed through with.  I want to make homemade sugar and gingerbread cookies.  I think I'm going to make cookies and some other kind of sweet treat for my adult family members again this year.  Last year I made gingerbread cookies and peppermint bark.  I'm thinking I want to change it up this year.  We'll see.

I know one reason I've been so scattered brained and haven't finished a lot of my projects is because I've been sick with an ugly cold that won't quite go away for the past week or so.  (Here I am losing track of time now.) haha
My son is right at 20 months old so he doesn't get that the tree is a pretty decoration that can be dangerous.
He listens pretty well when it comes to not touching the tree...  When I catch him in the act that is.  He's also tried opening one of his gifts already.
My David and I drove around with him Friday evening to look at Christmas lights and as we would come up to a house that was fully decked out in lights our son would get very quiet and then let out a little, "Owww.......  Purr-ty." <---(pretty)  It was so cute and fun for all of us.  We drove through the Sonic Drive-In and got a Peppermint milk shake and we all shared it as we drove around enjoying the holiday season.  The a house down the road from a place we use to live that seriously was built to look like a doll house and every year the elderly woman has her home decorated from top to bottom and even has Christmas music playing, It's beautiful!  We drove by the "doll house" and stopped the car and got out with our son to look at all of the lights.  No, we are not crazy people.  People stop at her place all of the time to look and oww and aww at all of the lights and decorations.  Anyways...  Milo absolutely loved it!  He was so excited and kept bouncing up and down in our arms, clapping his hands, talking gibberish in the most excited voice and of course made his Oww's and Aww's.  As we were getting ready to leave and start putting him back into his car seat he started throwing a fit!  It was pretty extreme but I couldn't help but to laugh and think it to be the cutest thing ever.  Normally, I wouldn't have laughed but I couldn't help it.  He was just so excited and happy and didn't want to leave and that was the first time EVER that he through a fix because we were leaving somewhere.
Here's a picture of the "doll house" that I found here on online and yes, it's a day time picture but just look at how pretty it is during the day and just imagine it at night! I'm going to try to drive back over that way and take my own picture when it's dark out.
Shouldn't be to hard because I want to drive around one more time before Christmas is over to look at more lights.  It's definitely one of my favorite things to do.  When I was a teenager, my best friend Sammy and I use to do that together every year.  I miss those past times but it's amazing having a child and getting to share that enjoyment with him now.


Saturday, 12/8/12
We got our son's hair cut for the first time ever!
I loved, loved, loved, LOVED his long hair with curling ends but it was always in his eyes (I hate that) and I finally got tired of people calling my handsome son a girl.
It was time, so David got his hair cut and after he was through we got Milo's hair cut.  I was so excited and when the lady cut that first clip....  I wanted to cry.  Of course, sentimental Momma wanted to cry.  I got a little pony tail with his curls and a few stray clippings in an envelope.  The lady that cut his hair also gave me a "My First Hair Cut Certificate".  So cute and perfect for his baby book.  Speaking of which...  I really need to break that out and go through and add more stuff.  There is so many different things in that book to add and write down it's really hard to keep up with it.
Back to Milo's hair cut.
He started out with that cover to keep the hair off of him but he didn't like his arms not being free so we just took it off of him and took his shirt off so it wouldn't get hair all over it.
He wanted to touch and figure out what was going on with his hair so it was a little hard to get him to sit still so we gave him his first sucker and that kept him quite pleased and calm.
He did so well.  I am so proud of him!  I am truly blessed.
This is his Before and After pictures.  Everyone keeps telling us how he looks like a completely different kid now and I would have to agree.


Before

During

After


We had more stuff to do in town but we definitely had to go home and gave him a bath to get all of the hairs off of him.  hahaha  It was really bad because he made such a sticky mess with that sucker.

Not much happened Sunday, we stayed home and worked on house work and David has been building a shed out back for his tools and such.  Man, I can not wait for the day that we move into a house with TONS of storage and closets!  We are so space deprived where we live right now.


I hope you all are having a wonderful Christmas season and are making the best of any and all situations.  Don't forget to take a few minutes out to help a loved one, neighbor and/or even a stranger out this holiday season.  We are not alone in hard times and everyone deserves a helping hand and to feel loved. 
I would like to also encourage you to donate to your local toy drive this Christmas season.

Merry Christmas and God bless!

Friday, December 7, 2012

Out with a cold

I've wanted to post for so long but with getting ready for my most favorite holiday CHRISTMAS and coming down with a cold I've found myself to be M.I.A.
I've worked on a few different projects as of lately, and yes they have to do with Christmas.  Psh, of course they do.  I'm "hoping" after this weekend I'll be able to post some more detailed events and projects.

I hope you all are well and healthy.  Take your vitamins, drink tons of water, wash your hands and for the love of God...  Stay home if you're sick.  (I couldn't sound more like a mom right now.)  hahaha

No, but seriously.

I have to go blow my nose now, then WASH my hands and make myself some soothing hot tea with honey.

Tuesday, November 27, 2012

We made ornaments tonight

I hope you all had a wonderful Thanksgiving, I know I sure did!  I made the best turkey.  I do have to say I am awful proud of myself for hosting my family this year for the first time.  Everything turned out so well and the food was A-MAZING!

Tonight the family sat at the kitchen table and made gingerbread ornaments together.
I wish I could share pictures with you all but of course I was at my Dad's and forgot my camera a few days ago.  I'm terrible at keeping track of that thing!
We made a few gingerbread people, 1 for each member of our household and a few others that I cut bite marks into like somebody had been eating on him.  It's really super cute.  Stockings, Candy canes, our Son's little hand print, a heart with our finger prints inside of it.  That one didn't turn out so well.  I think Salt Dough would work better for that idea.
Maybe I'll do a few of those this year as well.

Lastly, I would like to share that this is my favorite time of year.
I love the spirit of Christmas, all the beautiful Christmas music, Christmas lights that people use to decorate their homes, hot cocoa, peppermints, cookies, CHRISTMAS SHOWS like How the Grinch Stole Christmas, The Peanuts, Frosty, Rudolph, etc. etc.
I've already started a little bit of my Christmas shopping and my tree is up and decorated, now I just have a little house decorating to do and I'll be finished with that.  Everything makes me so happy this time of year!


I would also like to encourage you to buy a toy and donate it to your local toy drive.
We all know there are to many kids in this country that won't have a Christmas and it's the least we can do to help a family out.  I know a lot of people are broke in general and especially this time of year but just remember you don't have to spend a lot of money to show a child love and make them feel special.

When I was a child the place of employment my mom worked at burnt down a few weeks before Christmas and the community we lived in at the time donated items to the families that were effected.  My siblings and I received 2 gifts each and we all were more grateful that there were people (total strangers) out there that cared enough to share their love with us.
Be a blessing and give a little to someone that's in need more then you, your friends, family and even your children.

Merry Christmas and God Bless!

Monday, November 12, 2012

Apple Cider Rosemary Pork Chops.

While thinking of what to fix for dinner, I knew I was going to make pork chops.  I figured I would bread and fry them like I normally do but after opening the fridge and seeing the apple cider on the top shelf I had an amazing idea.  Why don't I fix baked apple pork chops?  Sounds pretty good eh?  Well, just so you know...  It really was.  You can't beat that it's so much more healthier then breading and frying them, too.  Win, win!


Ingredients:
4 thin pork chops,
2 small apples cut and cored into quarters,
(I think I used Gala, they aren't "baking" apples because they're soft but my family and I enjoyed them.)
1 medium onion peeled and cut into quarters,
2 Teaspoons of dried rosemary pitched and crumbled,
1 cup apple cider,
Salt and pepper.

You'll also need:
Baking dish and foil.

Directions:
Line your baking dish with foil so your food doesn't stick to the edges and for an easy clean up.
Place all 4 pork chops into baking dish, sprinkle salt and pepper and pitch and crumb dried rosemary over the top of them.  (Side Notes:  When using dried herbs you should always pitch and crumble them because it releases the aromatics and that's whats going to give you flavor.  You can use fresh rosemary if you prefer.)
Cut and core 2 apples and cut each apple into 4 quarter pieces.
Peel and cut the onion into 4 quarter pieces as well.
Place apples and onions on top and along the sides of the baking dish.
I stated 1 cup of apple cider but I didn't really measure it so I'm guessing 1 cup.
I poured the cider into the bottom of the dish until the bottom of the dish was covered.
Place baking dish into a preheated oven set at 400 degrees F, uncovered and for about 30-45 minutes.  Again, I'm guessing because I forgot to look at the clock when I put mine into the oven but if you're a freak about under cooked meat then I highly suggest you insert a meat thermometer into the middle of a pork chop and look for a temperature of 160 degrees F.
After your meat is fully cooked, take them out of the oven and let them set for about 5 minutes.
Serve and Enjoy!

Next time I'm going to mix the apple cider with apple cider vinegar.  I felt like they needed a little more pizazz, not much, just a little.
If you try this recipe and you add a splash of apple cider vinegar, please let me know how it turns out.  I would love to hear your feed back.


Saturday, November 10, 2012

Harvest Photos Of My Baby Boy

I went to a corn maze down the road from my sister's place and the lady that ran the place let me and my son in for free so I could take these amazing photos!
I'm head over heels in love with all of these pictures.


Well, on the other hand...  Maybe I do.


Friday, November 9, 2012

My Son the Hobbit

This post is definitely 9 days late.
Sorry about that...  Oops.  I've been surprisingly busy this past week and a half.  It's funny how life can get so crazy all of a sudden.
 
I won't make you wait any longer!
Here is the picture of my son in his Halloween costume.
Not many people got that HE was a Hobbit nor a BOY!  Poor thing keeps getting called a girl because of his long hair that his father and I are in love with!


This picture I know doesn't have the best quality but it's been extremely hard taking pictures of him lately because he's been such a little busy body.
I made his Hobbit feet and cloak, the cloak was made out of an old black adult sized t-shirt.  The shirt, jacket and pants I bought at Goodwill.  I dyed what were khaki pants into brown ones and then I cut his pants and shirt to give them that "worn 'n' torn" look about them.  It was such a fun outfit to put together for him.  I think he makes the perfect little Hobbit.  I also had a double finger feather ring that was tied in with his cloak under his chin and a leather strung necklace with an old ring on it. 

 
Here's a picture of our pumpkins that David carved that I have to show off.
I drew faces on the one in the middle and the right side.
My Babe couldn't make a cool face with his (on the left) because the skin of the pumpkin was at least a quarter of an inch thick.  Tuff stuff!  You can tell how thick it is in the picture because the pumpkin is all black.  You can't see any light through it's skin like the other two.
The way we figure the pumpkins...
The one of the left is David, the middle is our son and I'm on the right.
Aren't they/we adorable?
 
We had such a fun time taking our son out Trick or Treating.  I rolled/sprang/fractured/something that hurt my ankle really bad and left me half crippled the day before Halloween so I hobbled around the neighborhood we were in trying to make the best of it.
 
Perhaps you're wondering how I hurt my ankle?
EVIL SPIDER!
I saw a tiny EVIL spider on my living room wall, I grabbed a flip flop and jumped up and smacked it's guts out and landed on the side of my right ankle.  OH MY LORD!  I have a terribly ugly black, purple and green bruise all over my foot and it swelled pretty badly.  I wasn't able to walk for 3-4 days, I can walk on it now but it start to hurt really bad after a short period of time and driving even hurts it.  Ouch!
Some say "I bet you learned your lesson, killing that spider and all."
My response "Heck NO!  It might have gotten me to hurt myself but I killed him!"
So who really won this battle?
Spider 1 - Me 2
Brouhaha.

Again, I know this is late but I hope you all had a safe, happy and memorable Halloween.
 
Peace, Love & CANDY TIME!

Monday, October 29, 2012

Tea Dyeing Tutorial

After doing a tea dyeing test run on a white t-shirt, I knew that tea dyeing a pair of old tube socks would be perfect for my sons Halloween costume.
 
What you'll need:

8-10 tea bags,
Pot of boiling water,
White cotton fabric,
and a spoon or tongs.
 
Instructions:
 
I used a cheap tea that I've had forever!
I wouldn't spend a lot of money on the tea, it all stains the same so go to the dollar store.  I'm pretty sure I bought this box of tea at Wal-Mart and it was super cheap.
I'm not sure how many bags you'll really need, I used 8 bags for a pair of tube socks but when I did the test run on a white t-shirt I used 15.  If you want a pretty medium brownish tan hue then I would use more bags, just to be on the safe side.
It's a good idea to tie your tea bags together, it makes them a lot easier to handle.

 
Depending on the amount of fabric you're using you'll need a medium pot of boiling water.
You want the least possible amount of water.  The less water, the darker your tea will be.
Once your water is boiling, take it off the hot burner and start steeping your tea bags.

 
Once you've achieved a dark murky color, discard the tea bags and insert your fabric and use a spoon or tongs to push your fabric down into the water and make sure it's all covered.  If you have any spots that keep floating to the top, you'll have to stand there and keep pushing them down because if it's above the water line, that part of the fabric will not stain evenly or at all.

 
This is what the tube socks looked like as I was letting them set.
I waited about 10-15 minutes for them to set.  The longer you wait the darker the hue will be.  You can wait over night if you think it best.
You can also reuse the old coffee grinds from your coffee pot to make a richer hue.
I didn't use coffee with the socks but I played around with it on that "test run t-shirt" that I keep mentioning.  It's a little difficult to manage because coffee filters aren't enclosed and you don't want coffee grinds in your water.

 
Approximately 10-15 minutes later I CAREFULLY removed the socks from the HOT water.
I poured the water out of the pot as I held the socks in the pot with my spoon and ran cold water into the pot to cool them off and then rung them out and threw them into the drier by them self.  I didn't want to chance staining my other clothes.
This is actually a terrible picture because the flash was to bright on my camera therefore making them look lighter then what they really are.


There you have it.  It's that simple.
Just a quick side note though, you should always try this dyeing method on a piece of cotton fabric that you can live without.  It would be terrible if you tried dyeing your favorite shirt and ended up not liking the color.  Also, I have NO idea how this dyeing method works on any other fabrics.  I have only used it on cotton.
 
I hope you've enjoyed this tutorial and that you'll have fun tea dyeing.

Sunday, October 21, 2012

I'll have to buy dye.

If you've been reading my posts you'll know that a few days ago I was trying to dye a white t-shirt dark brown with tea and coffee.  The tea and coffee did dye the t-shirt a pretty brown color but after letting it sit in my home made dye mixture, it never got dark enough for what I need it for.
So, I'm back to square one.  Next time I go to the store I'm going to pick up a bottle of dark brown dye so I can dye khaki pants for my sons Halloween costume.

I'm sorry if anyone was waiting in hopes that I would do a tutorial on tea and coffee dyeing but I don't have a need to dye anything else.
Maybe one day soon I'll think of something that I want or need to dye and then I'll post a tutorial about it.  If you read my previous post it's pretty self explanatory, I'm sure you're a smart cookie and can do it.

I can't believe Halloween is inching so closely.
I feel like it's in 4 days and I'm completely running out of time.  I've not really been busy but on the same hand I have...  (I'm weird.)  Anyways...  I'm annoyed with myself because I haven't done ANYTHING festive at all and here I am running out of time!!  AHHH!  I haven't made Halloween cookies, craved pumpkins, watched a scary/Halloween movie, ate a caramel apple, drank apple cider, hot chocolate....  Geezzzzz!  What is wrong with me?  I love doing all of those things and I always get so excited for them, but this year......... nothing....  I haven't even been to a corn maze!  Speaking of which, have you ever thought about this, the Indian's called corn "maze" and we have made up this fun event out of growing a field of corn and cutting it down into a maze?  hahahahhaa  I don't know why I have never thought about that before, or why I haven't heard anyone else talk about the irony behind that.  Hmm....  That's very humorous to me!  The funny little gears are turning inside of my head again...  (This could be scary!  BOO!)

Wednesday, October 17, 2012

Tea and Coffee Dyeing Experiment

Here's a little more about my sons Halloween costume alteration.
Like I said in my previous post, I have a few alterations to make to the clothing pieces I bought yesterday for my sons Hobbit costume.

I was trying to find him dark brown pants but I could only find khaki pants.
My first initial thought was to buy dark brown dye and dye them but tonight I reminded myself that I'm smarter then that!  I remembered I could use tea and coffee for dye.
Yes, sometimes my brilliance doesn't always come to me at once.  I have to sit a ponder at times to reach my full potential.  hahaha (not trying to sound cocky or pompous).

I've never dyed fabric, so before I submerged the khaki pants into a boiling pot of tea and coffee I figured it would be best to test it on an old white t-shirt.

Honestly, I first started out with 15 small tea bag and seeped them in a large pot of water that I boiled and took off the burner.  Once I got the water good and murky with a dark brown hue I put the t-shirt into the pot of water and let it sit for a little over an hour.  The former white t-shirt is now a khaki color so I got concerned that it wouldn't be dark enough for the actual khaki pants. 

The man of my life is terrible about removing the coffee grinds from the coffee filter screen after he's through making coffee so I took the coffee grind basket screen filter thingy and seeped it carefully into my pot of water.  (The t-shirt was removed from the pot at the time of seeping the grinds.) 

Now I have the t-shirt back in the pot of tea and coffee and I think I'm going to let it sit over night and see how dark it comes out in the morning.  I know the longer you set fabric in dyes the darker the color will be, so hopefully I'll be satisfied with it by morning so I can start on dyeing the actual costume pants.

If the t-shirt turns out well I'm going to make a tea and coffee dyeing tutorial on the pants.
Stay tuned and look for more news about it shortly.

Tuesday, October 16, 2012

Hobbit Halloween Costume

My son is 18 months old this month and we still haven't cut his beautifully long curling ends of reddish/brown hair.  Even though people tell us at least once a week that we should have cut it a long time ago.  Ugh, I hate it that!

Anyways, I was trying to think of a good Halloween costume for him this year and the thought of a Hobbit popped into mind.  OH A HOBBIT!  How perfect!  He has the perfect look for it, loves walking around outside with large sticks so I know he'll walk about with a "walking stick" and I figured I could find all the perfect outfit pieces for his costume at the Goodwill, which I was able to do today! 

I am so excited about the pieces that I found.  I really wanted to find dark brown pants but I couldn't.  I did find a pair of khakis and I think I'm just going to go to the super market and buy some dark brown dye and dye them.
I'm concerned about dying a pair of khakis because I know you're suppose to only dye white fabric....  So...  Yeah...  I need to find out some dying information.
(If you, yes you! Know anything about dying clothes I would love some feed back. Pretty please and thank you!)
I also found a white button up long shelve shirt that I'll have to alter just a tad and a dark green corduroy jacket that has cute little patches on the elbows of the shelves that's a few sizes to big which is perfect for the "Hobbit" look.
I have a few ideas on how to make a cloak but I'm not completely sure yet.
I also have a few other ideas that I'm pondering on but I'll save those for the pictures I plan to post as a "Halloween Costume Preview".

Sunday, October 14, 2012

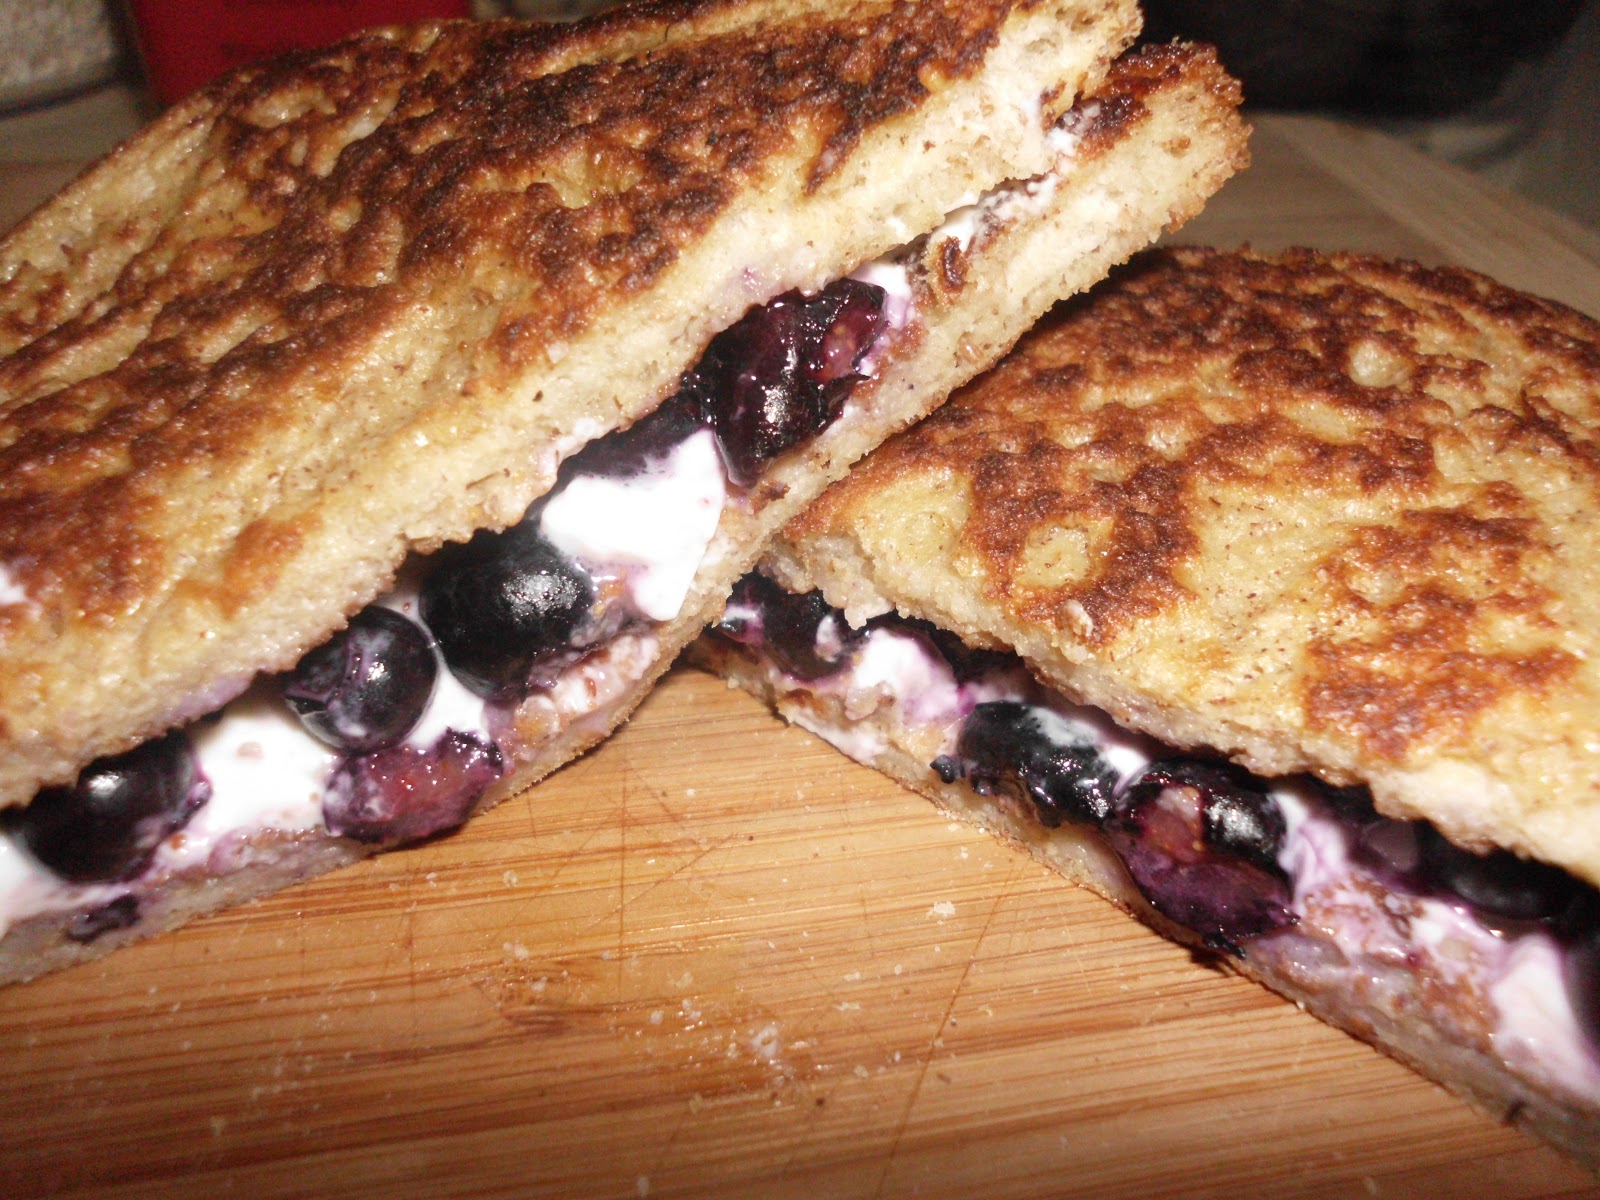
French Toast Sandwich

This is one of my families favorite breakfast foods.
It's sweet yet savory and best with seasonal fresh fruit from a farmer's market.
I love buying fruits and veggies from farmer's markets.
1) I'm supporting my local community.
2) They always seem to taste better.
and 3) I know they are fresher then the produce that you find in a super market.
We also like this a lot because it's a lighter and probably healthier breakfast sandwich than your Egg McMuffins.


To make this delicious sandwich is pretty self explanatory but I'll humor you anyways...

The ingredients you'll need are:

Bread,
Eggs,
Cinnamon,
Pure Vanilla Extract,
Nutmeg,
All Spice,
(I have a secret ingredient that I'll never tell so your sandwiches won't be as scrumptious as mine...  Sorry.)
Butter,
Cream Cheese,
Fresh Berries.

Heat a non-stick skillet on your stove top on a medium to medium-high heat.
Even though I use a non-stick pan I still like to put a tablespoon of REAL butter in it and have it melt down.  As your skillet it heating up start on your egg mixture.
In a medium bowl, crack open 1 egg.
(Use 1 egg per 2 pieces of bread.  1 sandwich = 1 egg, 2 sandwiches = 2 eggs.)
Take a whisk or fork and scramble your egg/s.
I like to use a fork because it does the same thing as a whisk and it's a heck of a lot easier to clean.  Let's be smart people, no need to give yourself extra work around the house when it's unnecessary.
I never measure the spices, I just give the cinnamon a few good heavy shakes, a few dashes of all spice, a pinch of nutmeg, you don't want to go over board with the nutmeg.  Trust me! 
Lastly,  about 2 tablespoons of vanilla.
Mix those all together until the spices look evening mixed. 
You may have to scrap the sides of your bowl because the spices will stick to them and you want all those yummy flavors.
After you have your soon to be delicious mix done, dip both sides of a piece of bread into it and put it in the pan.  Watch it and wait to flip it until you get a nice golden brown color. 
When you're finished with your french toast, spread the cream cheese on one side of 2 pieces of french toast and add fresh berries to one piece and put your warm slices of french toast together and there you have it!

A yummy breakfast sandwich that doesn't consist of a bunch of greasy bacon or sausage.  Don't get me wrong...  I love both bacon and sausage but we both know how fatty and unhealthy it is.  Why does your butt, gut and thighs hate everything your tongue loves? 
Yes it has cream cheese on it but it's a dairy product and I never feel guilty for eating real dairy unless it's ice cream, but that's not "real" dairy.  If you're worried about calories then use a smaller amount than you normally would.  Portion control is key.  Oh, and you can use any type of berry you prefer.  I tend to use more blue berries because my mother in-law has blueberry bushes and she likes to pick them and bring gallon bags over to us.  I'm a lucky gal!

Saturday, October 13, 2012

DIY Diaper Cake

I was cleaning off my desk the other day and came a crossed an invitation to my friends baby shower that I had completely forgotten about.
Panic starts to set in!
Oh, holy crap!!!  What in the world am I going to do with no time or budget to pick up a great gift?
I'm always so thoughtful and creative and I feel as if I ALWAYS have to be when giving gifts and plus it's for someone that was very thoughtful at my baby shower.  I was excited about it when I first received the invitation but with lack of much needed sleep, my 1 year old running circles around me all day and trying to get all my house hold chores done it had easily slipped my mind.  What was I to do with "no notice"?  I need time to budget myself, save money, figure out what the mother to be needs and/or wants, plan what and how to present my gift, should I buy and put everything into a basket, tray, diaper bag, I GOT IT!  A DIAPER CAKE!
It's cheap, easy and fool proof!!!

I could only afford to spend $25.00.  Yikes, that doesn't seem like a lot of money when we're talking about a baby shower gift.  Everyone knows how expensive baby stuff is unless you're a smart shopping, budgeting Momma like myself.

I went to Dollar General.  Yes, I bought supplies for a baby shower gift at the dollar store.
Don't judge, be impressed!
Diaper cakes are super simple and easy.

The supplies that you'll need are:
(These are the items I bought today that were suited to the mother to be needs, but you can pretty much get whatever. Your options are endless!)

Diapers, (I used 50 diapers.) (the bigger count of diapers you buy the bigger your cake.)
Baby Wipes,
Bordeaux's Butt Paste,
Healthcare Kit, (medicine spoon, thermometer, nose cleaner, nail clippers, etc.)
Teething Ring,
Teething Tablets,
Rubber Bands, (make sure you have enough for each diaper and a few extra.)
Card Board,
Pen,
Scissors,
Card Board from a Toilet Paper Roll or Paper Towel Roll,
(paper towel roll is going to be your better option.)
Duct Tape,
Ribbon,
Curling Ribbon,
Card Stock
Gift Bag,
Tissue Paper.

Keep in mind, this isn't the "only" way to make a diaper cake, it's just the way I was able to make mine.  I used what I had around the house so I could save some pennies. 
No harm, no shame.  It's what the mother to be needs and it looks really cute, so who cares.

Instructions:

Start out by rolling up the diapers.  You'll want to lay the diaper front side down and with the top part of the diaper closest to you and roll and use a rubber band to keep them secure.  Depending on how big your rubber bands are you may have to wrap them around the diaper and couple of times.  I only needed to wrap it twice and be sure that the rubber band is in the middle of diapers.

I used 16 diapers for my top layer and 34 diapers for my bottom layer.
If you're making a cake just like mine take 16 already rolled up diapers and rubber band them all together with 1 rubber band.  The rubber band needs to lay a crossed the rubber bands on the diapers.  There's no need to wrap the rubber band twice around the layers, it should be secure enough to keep them all together.
And then do the same to the other 34 rolled up diapers.
Make sure that the outside of your layers aren't showing the ending rolled edge of the diapers.
It's easier to rubber band your rolls together and then turn any diaper rolls around. 
This way the cake will have a clean, even look to it.
(See the 5th picture down from here to see what I mean.)


You'll need a platform for the bottom layer of your cake so when you pick it up it won't fall apart.
I didn't have anything special around the house so I used a card board diaper box that my sons diapers came in.
I broke the box down at the glued areas and opened it and laid it flat.
I then took my 34 ct. bottom layer of diapers and set it on top of the box and drew a circle around the layer as close to it as I could possibly get without getting ink on the diapers.
You could use a pencil for your circle outline but I wanted to be able to clearly see my marking.

Cut out your circle outline.
You'll want to cut about 1 - 2 inches inside and all the way around your circle, that way you won't be able to see the card board when you put your bottom layer over it.

Then you'll duct tape a toilet paper or paper towel roll in the middle of your card board circle.

My toilet paper roll is actually centered, my circle is just a bit lop sided because my scissors broke and I had to use a knife to cut my platform out.

 
I used a toilet paper roll because I didn't have a paper towel roll.  Toilet paper rolls are long/short enough for 1 layer.  Since I didn't have a paper towel roll.  I cut off one of the longer flaps on the diaper box that I used to make my circle platform.  I then bent the flap long ways to try and make a rod and rubber banded both ends together.  I slipped my "card board rod" into the toilet paper roll hole, and placed the top layer of diapers over the "rod". 
Try to center the card board the best you can in the middle of your diapers.


This is where it gets really fun!
Wrap your ribbon around the middle of each layer where you have your rubber band line and tie a pretty bow.

I then put the Teething Tablets on the top front of the bottom layer and tucked the top flap part of the box under the top layer bow. (Look at the picture and you'll see what I mean.)
I also had a few tiny plastic clothes pins that a friend gave me for my baby shower, I clipped them on the box flap and the top part of the bow on the top layer so it looks like there at holding up the box.
I also clipped tiny plastic baby bottles with ribbons glued to them onto the bottom layer bow with the tiny clothes pins.
You don't have to use embellishments, I did because I had them laying around the house.

I then took the Bordeaux's Butt Paste and stuffed it down the middle of the top layer of diapers right above where my "card board rod" is and then set the Teething Ring tilted on the front of it.

Last but not least.
I made a little note card to put on the cake.
I measured out a 3"x6" Card Stock strip and folded it in half and I recently bought a fancy little Martha Stewart paper punch (on clearance and saved $10. on it at Hobby Lobby!  I love a great deal!!!) and with the card folded in half I punched along the top and bottom edges of the card.
I then punched a small hole in the side of it by the fold line with a hole punch and tied it to the top layer bow with curling ribbon.  Honestly you could use any type of ribbon or string that you have around the house.  Remember, saving pennies is a good thing...  For anyone.

That's it.  The diaper cake is finished and for the Baby Wipes and Healthcare Kit...
I didn't have enough room on the cake for them so I put them in a gift bag with tissue paper that I also had laying around the house and made a tag that looks the same as the one on the diaper cake and a pretty curling ribbon bow and put them on the gift bag..

 
I really like it when I'm able to save little things like gift bags, ribbons, party embellishments, etc. etc.  I recommend it to everyone as long as you have a place to keep it neatly organized.  If you're not organized about little things like that then when the time comes to use it you probably won't be able to find it.  So therefore, what's the point in having it if not to use?
I'm not the most organized person (lack of space) but I do keep all my party embellishments and supplies all together so I'll know exactly where I find them.
Thank God too, I would have spent more money then what my budget called for or wouldn't have been able to get my friend as much stuff as I did.

I hope this tutorial has inspired you in same way.